Visual Guides for Disability Services
Please click on the title to expand the visual guide. PDF attachments for auditory access are to come.
-
How to Request Your Accommodations
Always start by logging into your Student Portal with Disability Services on the Student Login Page on COCC.
1. After about 24-48 hours after you registered for classes. Logged into your account to be brought to your overview page.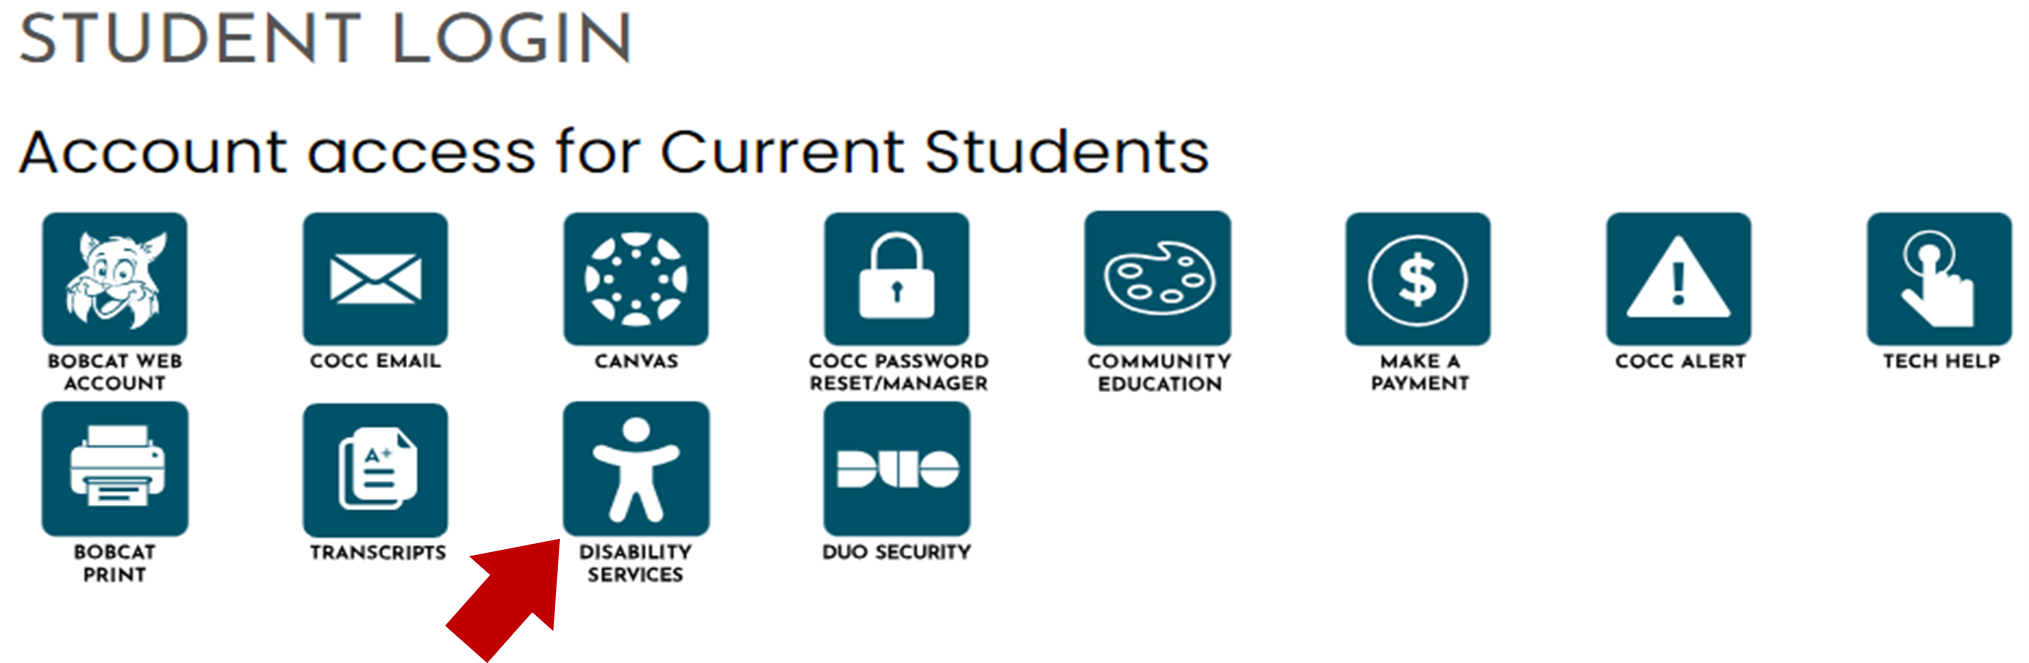
NOTE: If you do not see your overview page, you might be needing to complete an agreement form, please view the form and E-sign by typing your name and submit form.
3. This will bring you to a list of your course to choose which ones you wish to request accommodation(s) in.
2. Click on ‘Add Requests for # Classes’ this number will be the total number of classes you are currently registered in.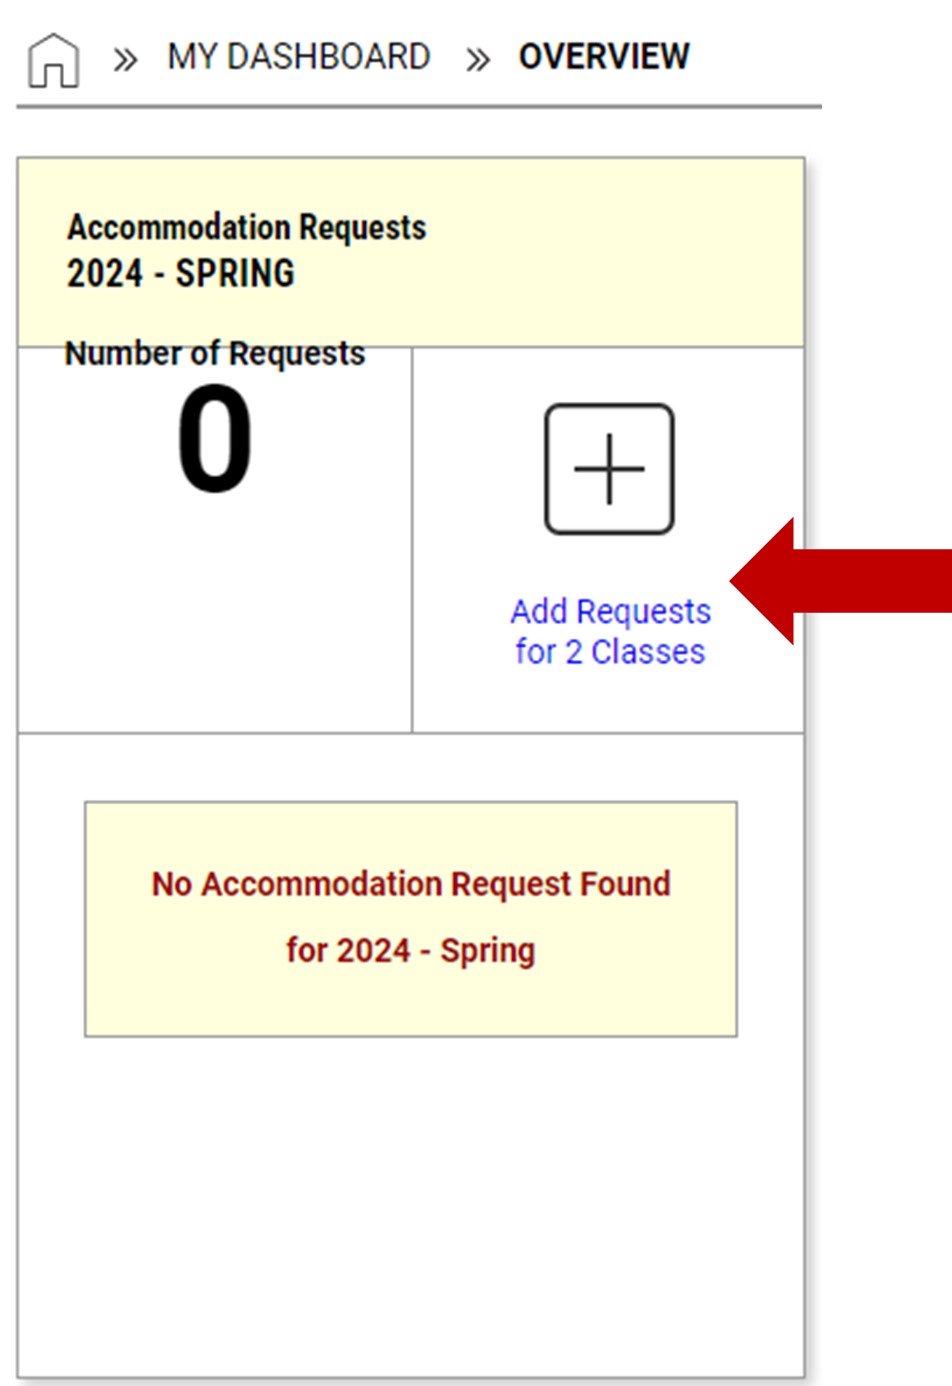
a. Select courses by check marking box next to course title.
b. Click ‘Continue to Next Step’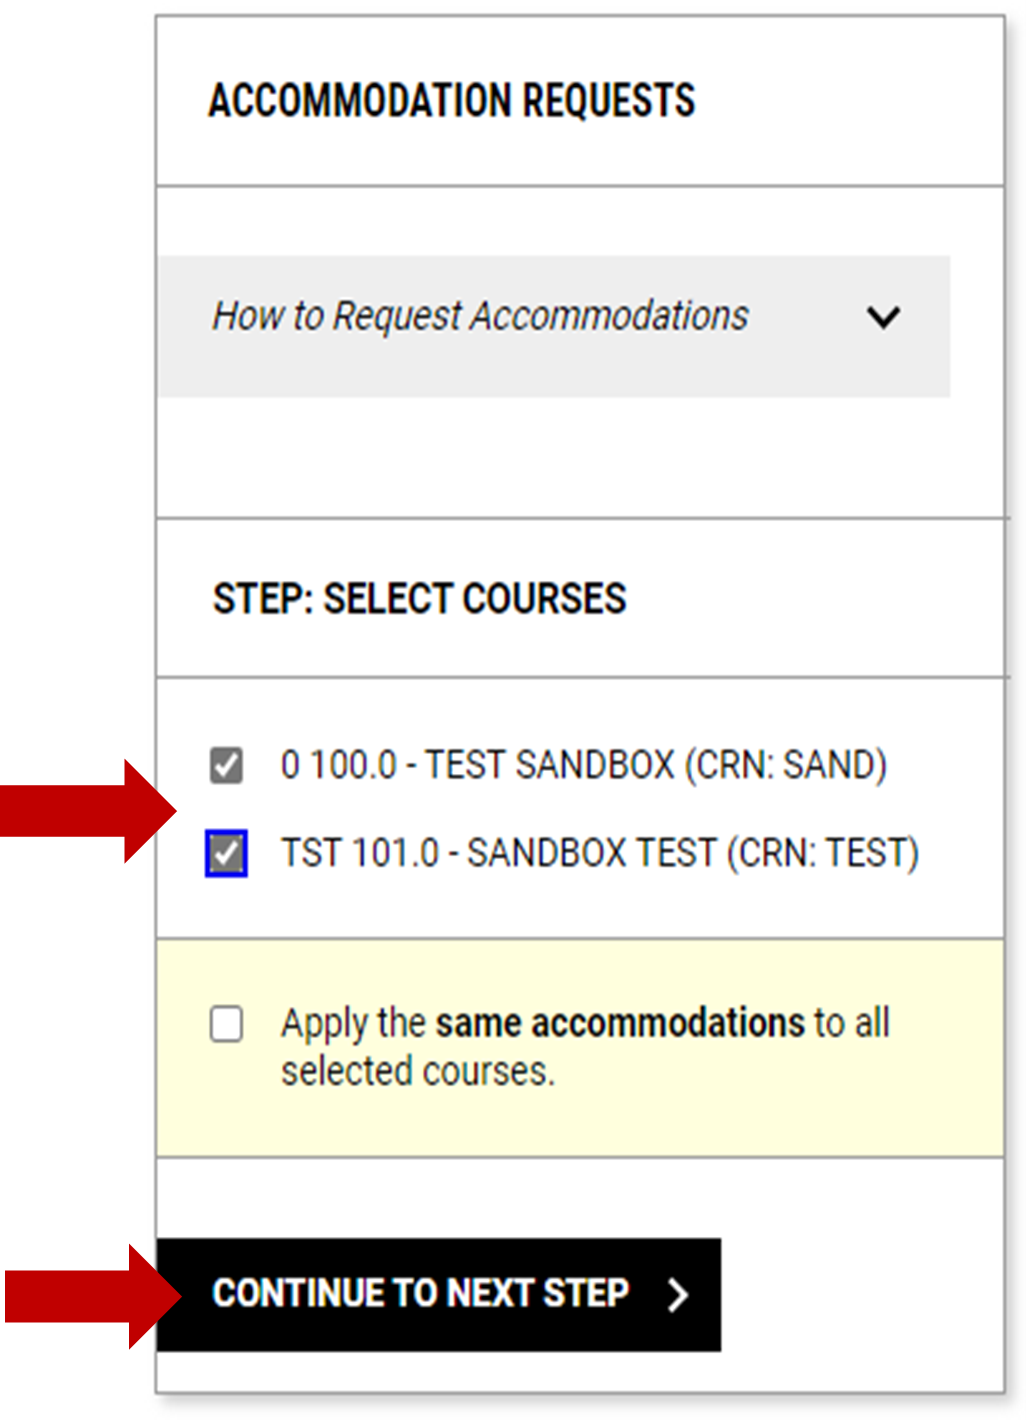
4. This will bring you to all of the courses listed out separately for to select all the accommodation(s) you would like in each course. You may review the course information by clicking on the down arrow next to Course Detail.
a. Select your Accommodations for each course, by selecting the checkbox next to accommodation. NOTE: There is now a Select All option listed at the top, if you wish to do have all your accommodations selected.
b. Click ‘Submit Request’
5. Once clicked and system processed you will receive a green checkmark stating ‘SUCCESS! YOUR ACTIONS HAS BEEN COMPLETED’.
a. If you do not receive this, the system was unsuccessful in processing and will receive an Error message explaining what it is needing for you to do.
-
How to Modify Your Accommodation Requests
Always start by logging into your Student Portal with Disability Services on the Student Login Page on COCC.
1. Using the Accommodation Requests box with current term under ‘List of Accommodation Requests:’ Click on the course you want to modify.
2. This will bring you to the full request of this selected course. Scroll to ‘Accommodations’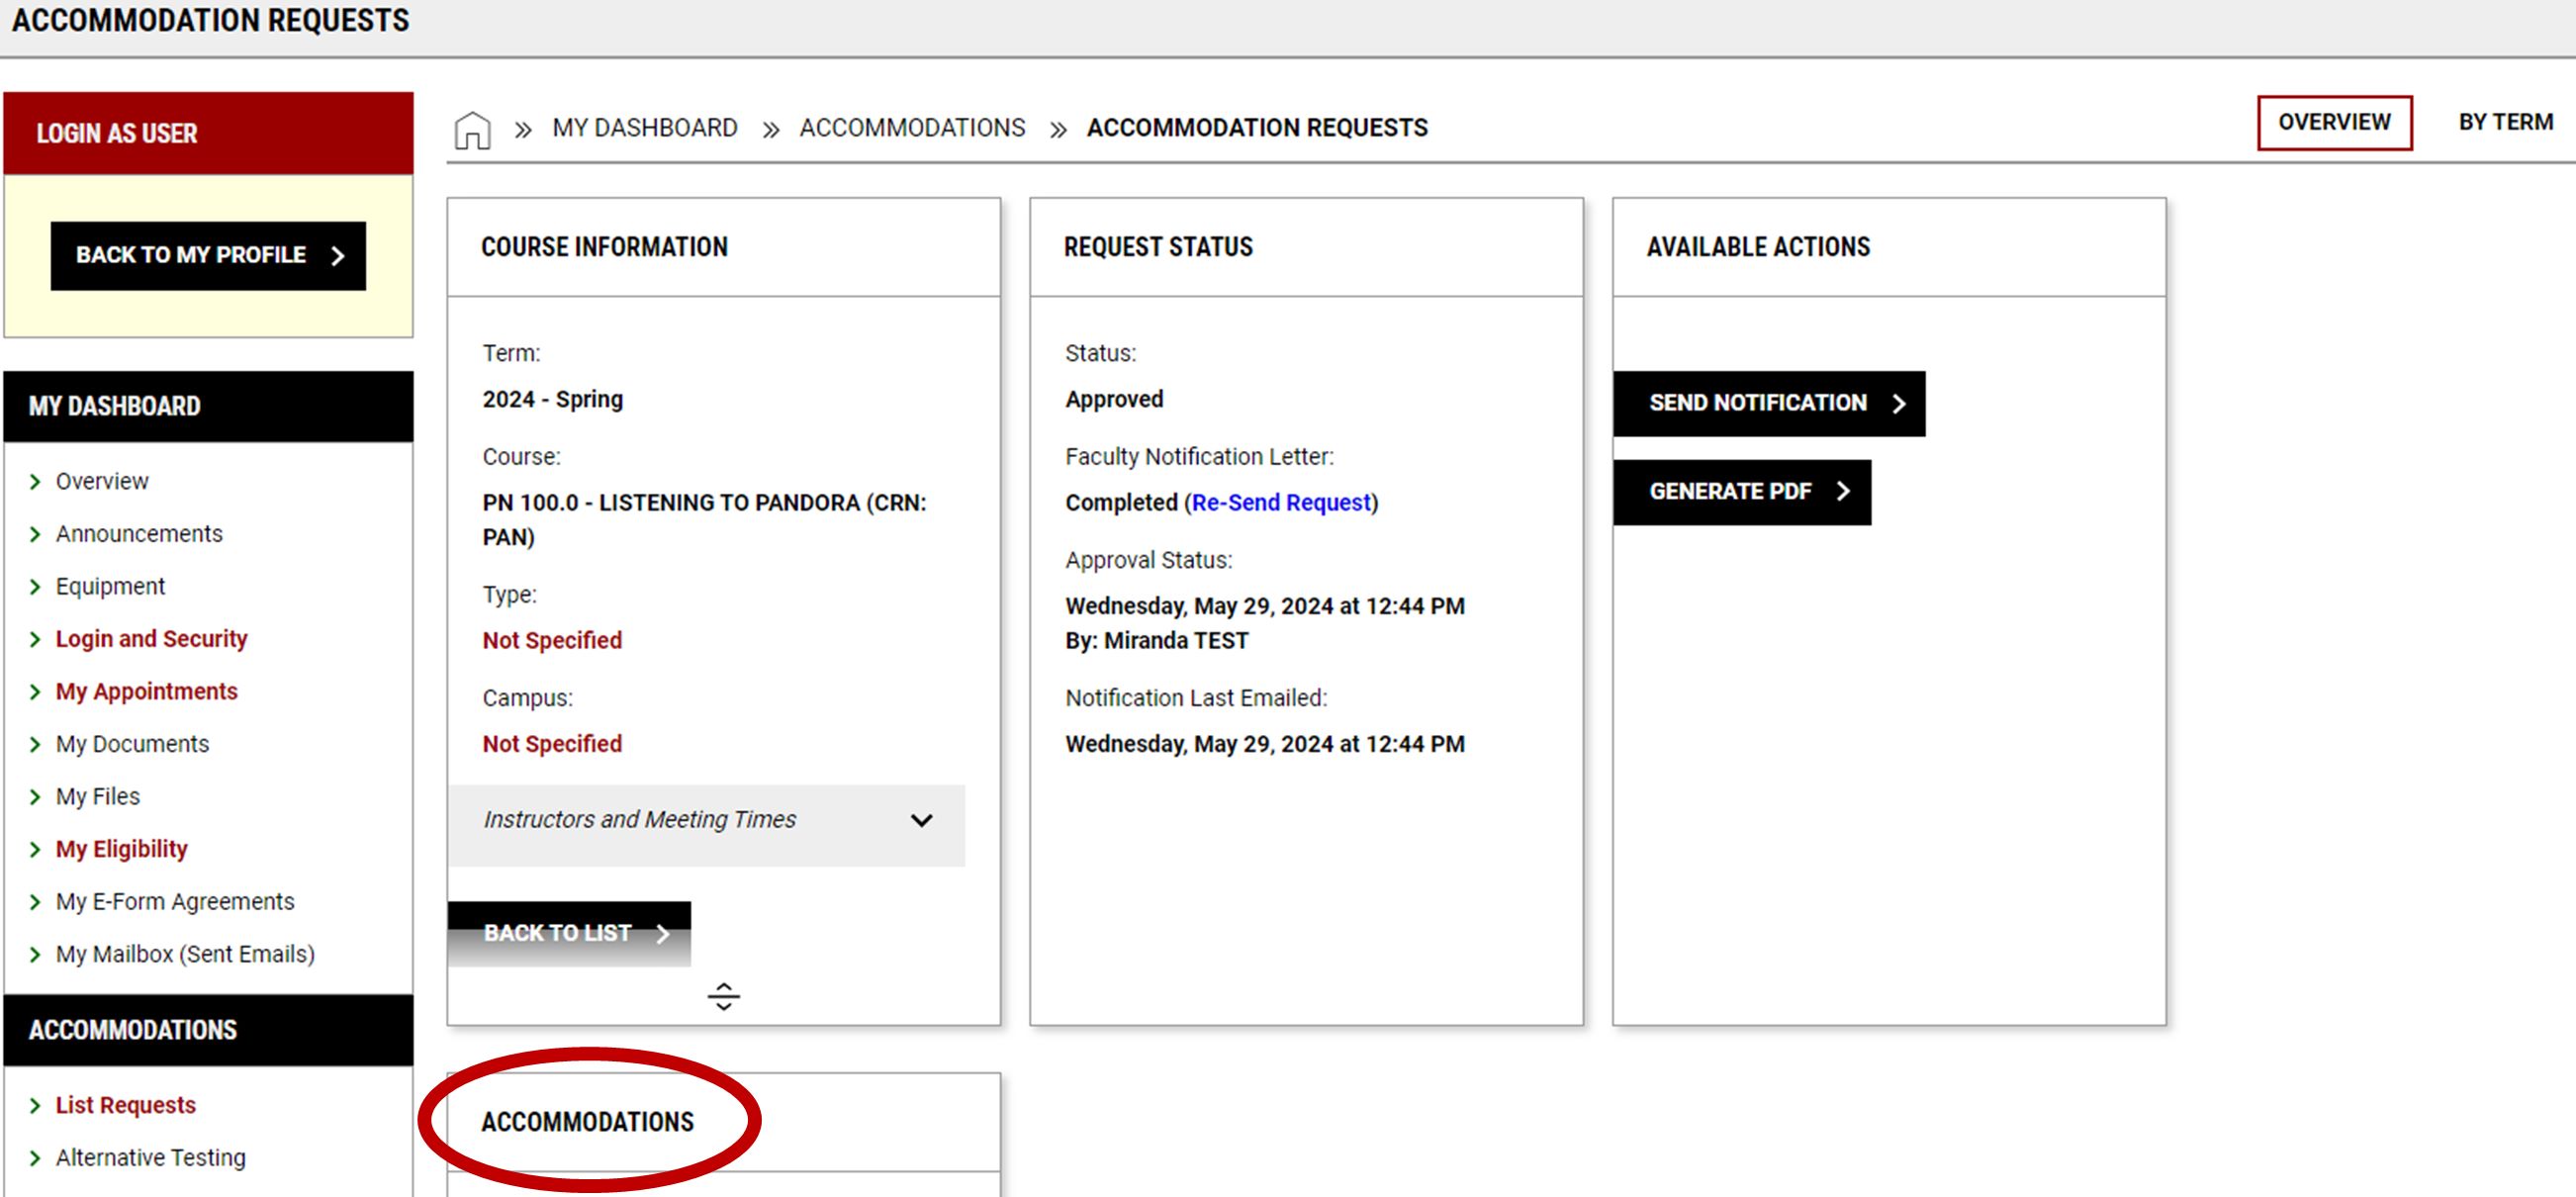
3. Using the Accommodation box select or deselect the accommodation(s) checkbox to reflect the accommodation(s) you want to have in the course.
a. Once selected/deselected your accommodations, Click on ‘Updated Request’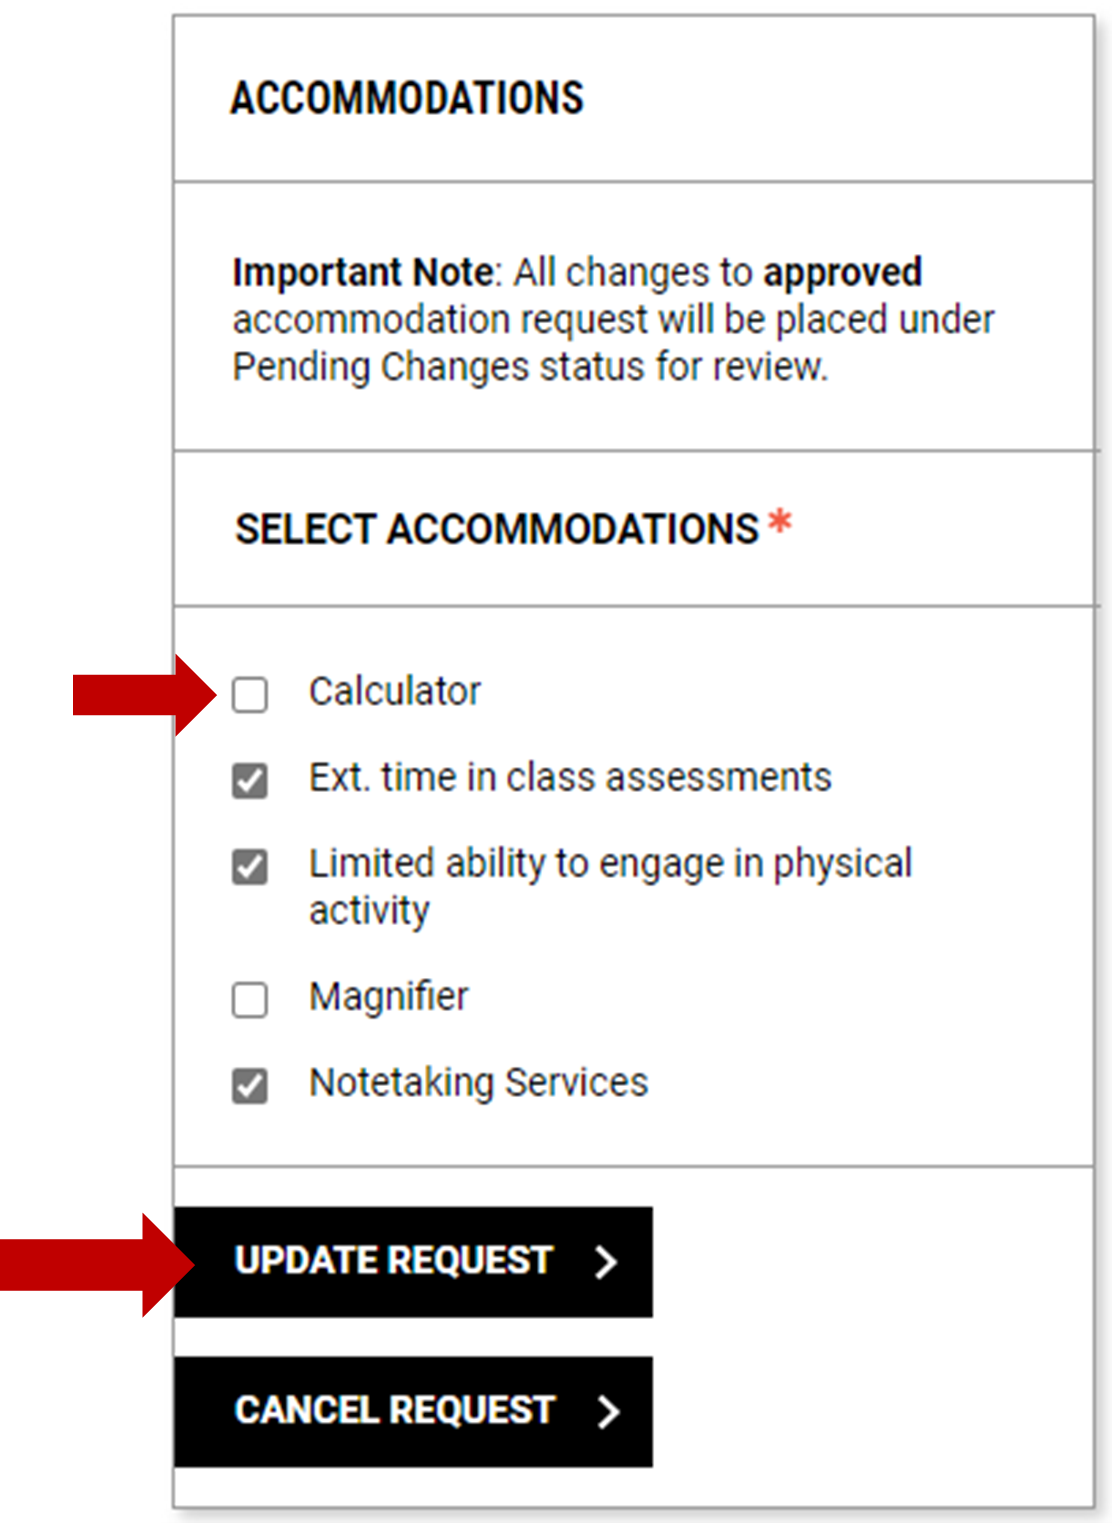
4. Once clicked this will bring you back to the full Accommodation Request of this course with a green checkmark at the top of the page stating ‘Success! Your Action has been Completed’ if you did not receive this message the system did not go through correctly.
a. You should also now see an update to the status of this request to read; ‘Status: Pending Changes (Student)’ this is meaning you have requested a change and is pending for Disability Services office to approve this change. Disability Services office will approve on the next business day.
-
How to Cancel Your Accommodation Requests
Always start by logging into your Student Portal with Disability Services on the Student Login Page on COCC.
1. Using the Accommodation Requests box with current term under ‘List of Accommodation Requests:’ Click on the course you want to modify.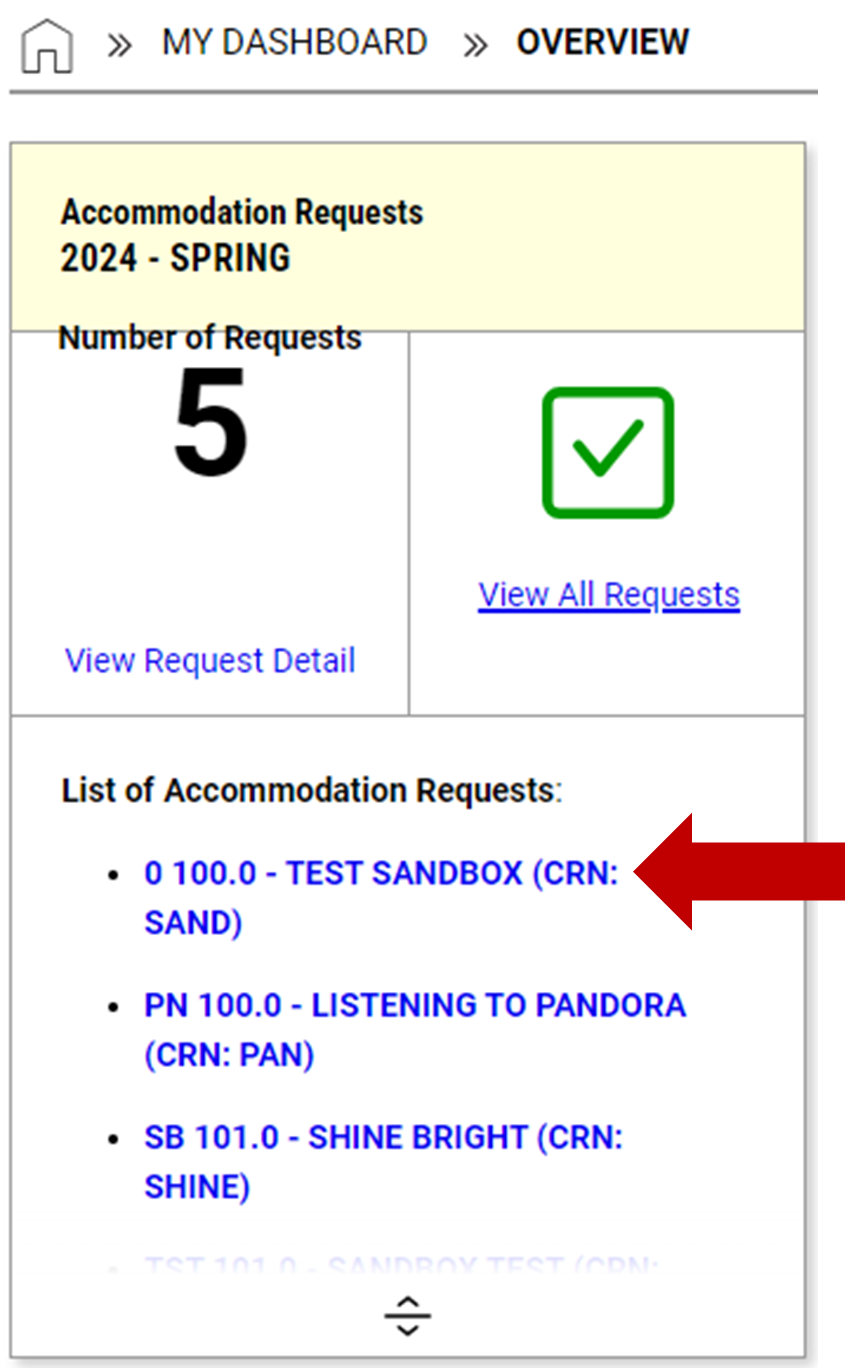
2. This will bring you to the full request of this selected course. Scroll to ‘Accommodations’
3. Using the Accommodations box Click on ‘Cancel Request’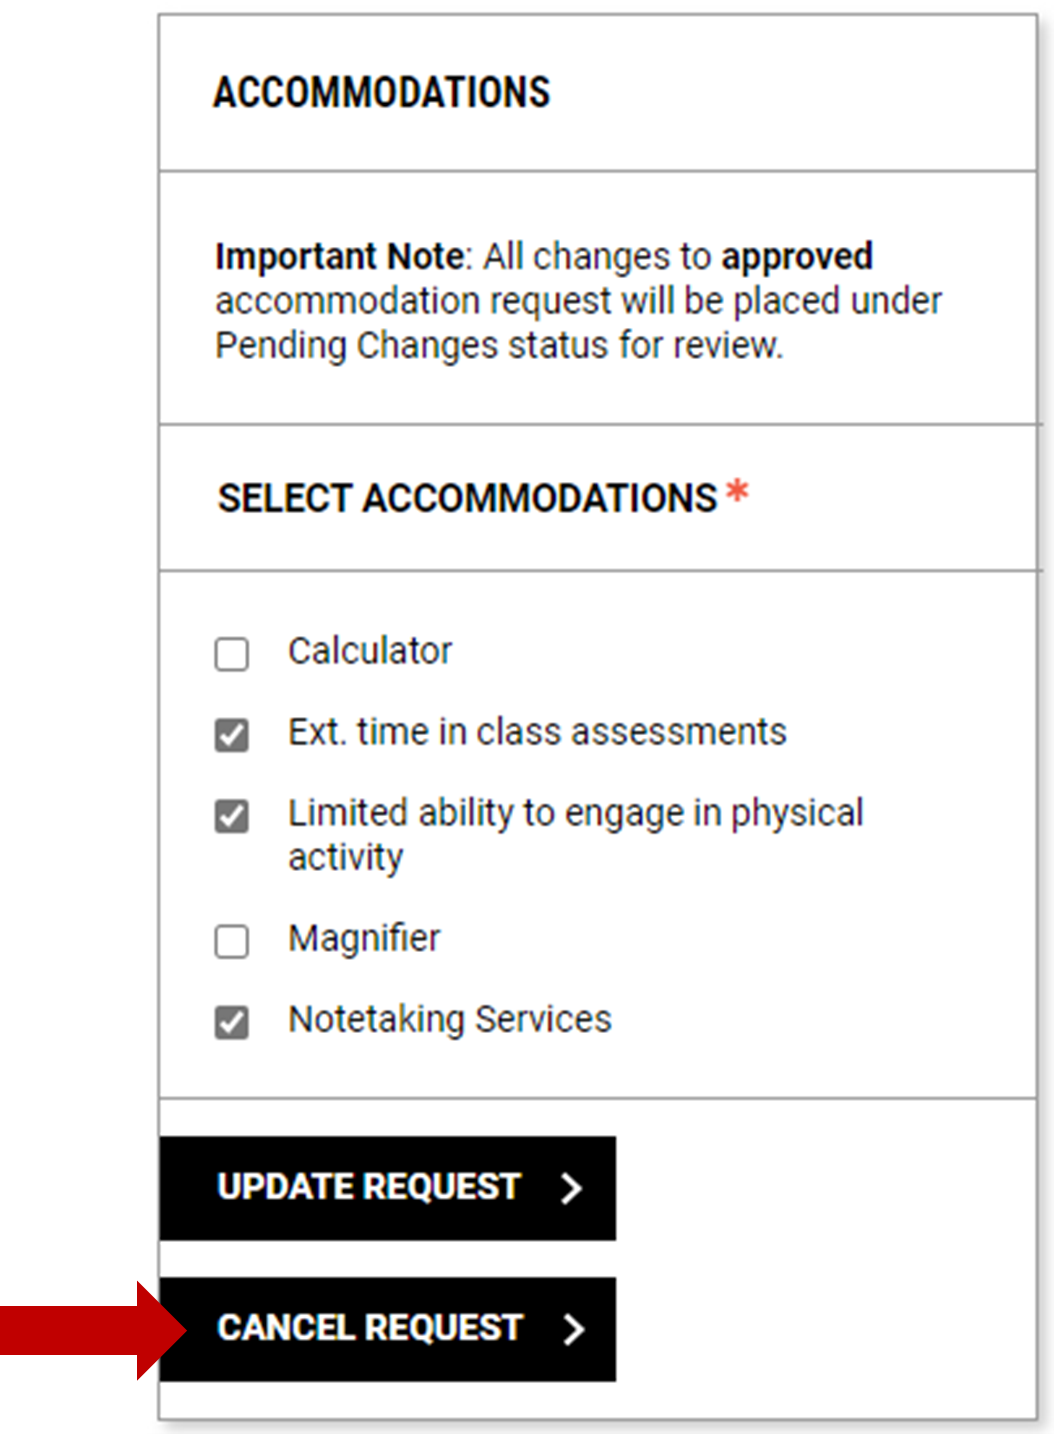
4. This will take you the Accommodation Requests page.
a. Select a reason why you are cancelling this request by using the drop-down menu found in ‘Cancellation Reason’ box
b. Click ‘Cancel Accommodation’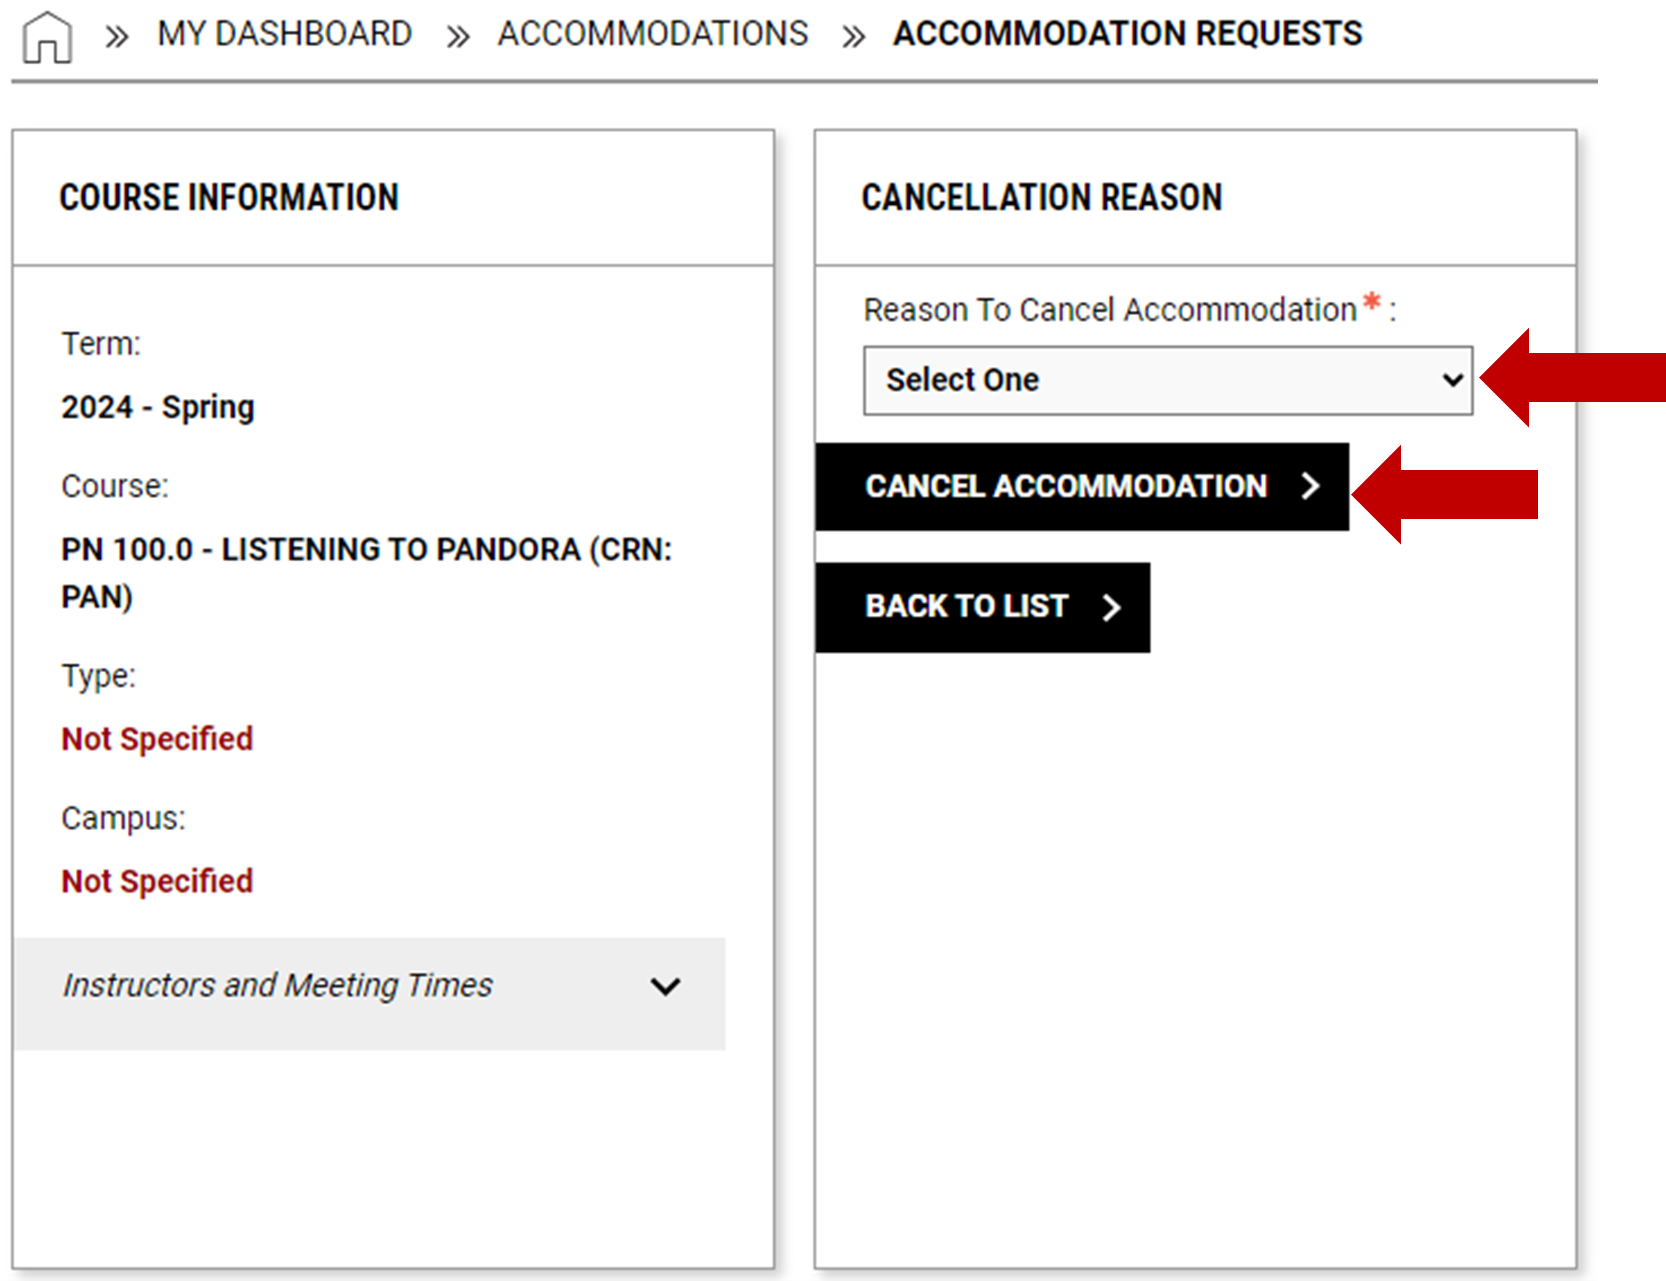
5. Once clicked this will bring you back to the full Accommodation Request of this course with a green checkmark at the top of the page stating ‘Success! Your Action has been Completed’ if you did not receive this message the system did not go through correctly.
a. You should also now see an update to the status of this request to read; ‘Status: Pending Changes (Student)’ this is meaning you have requested a change and is pending for Disability Services office to approve this change. Disability Services office will approve on the next business day.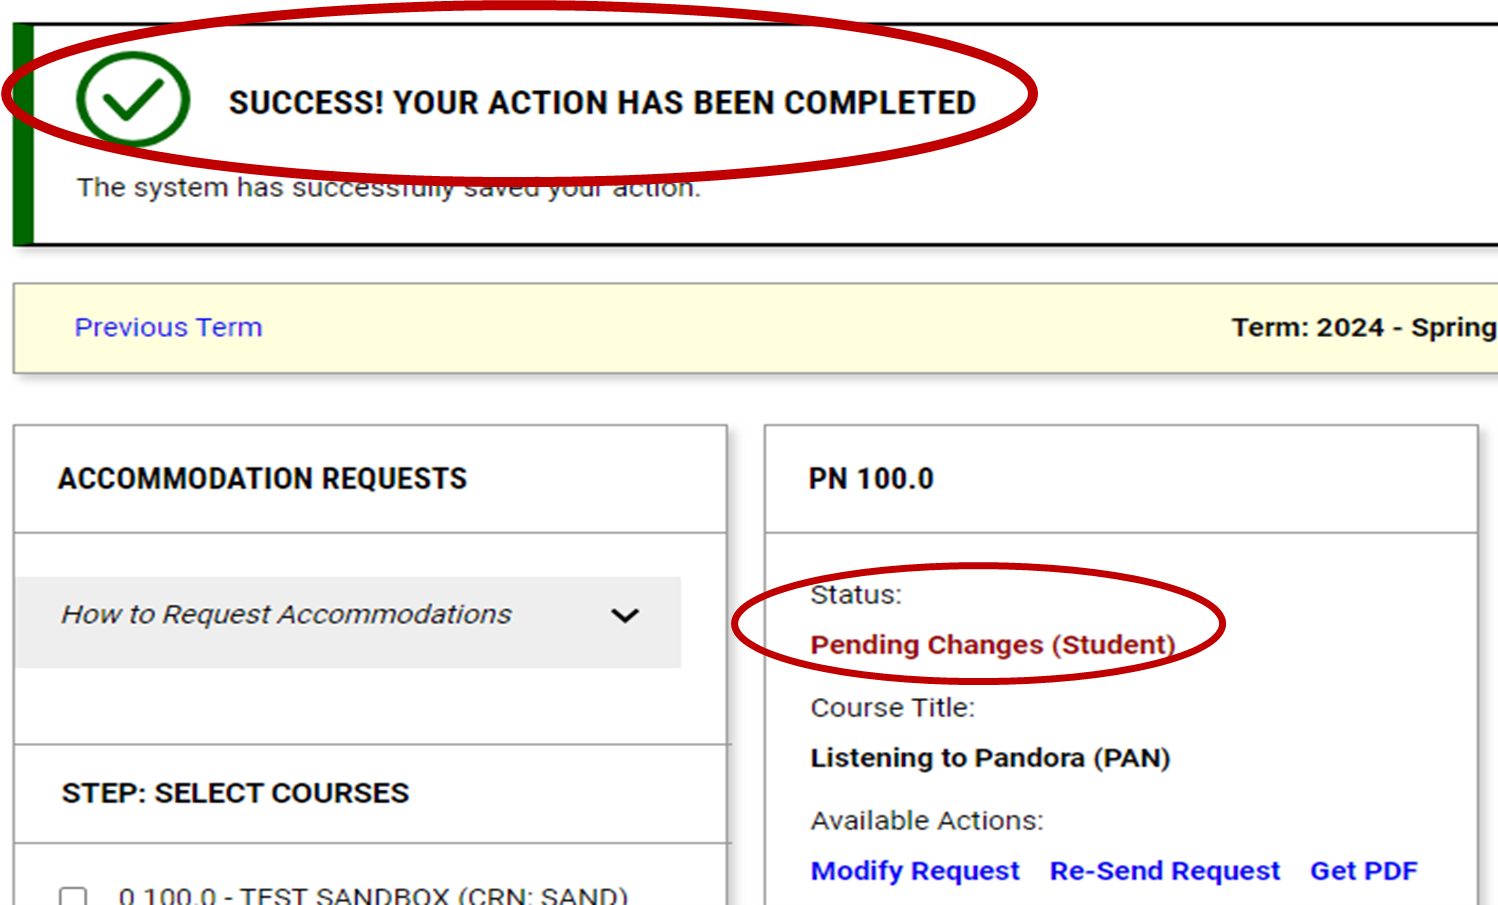
-
How to View Your Eligibility
Always start by logging into your Student Portal with Disability Services on the Student Login Page on COCC.
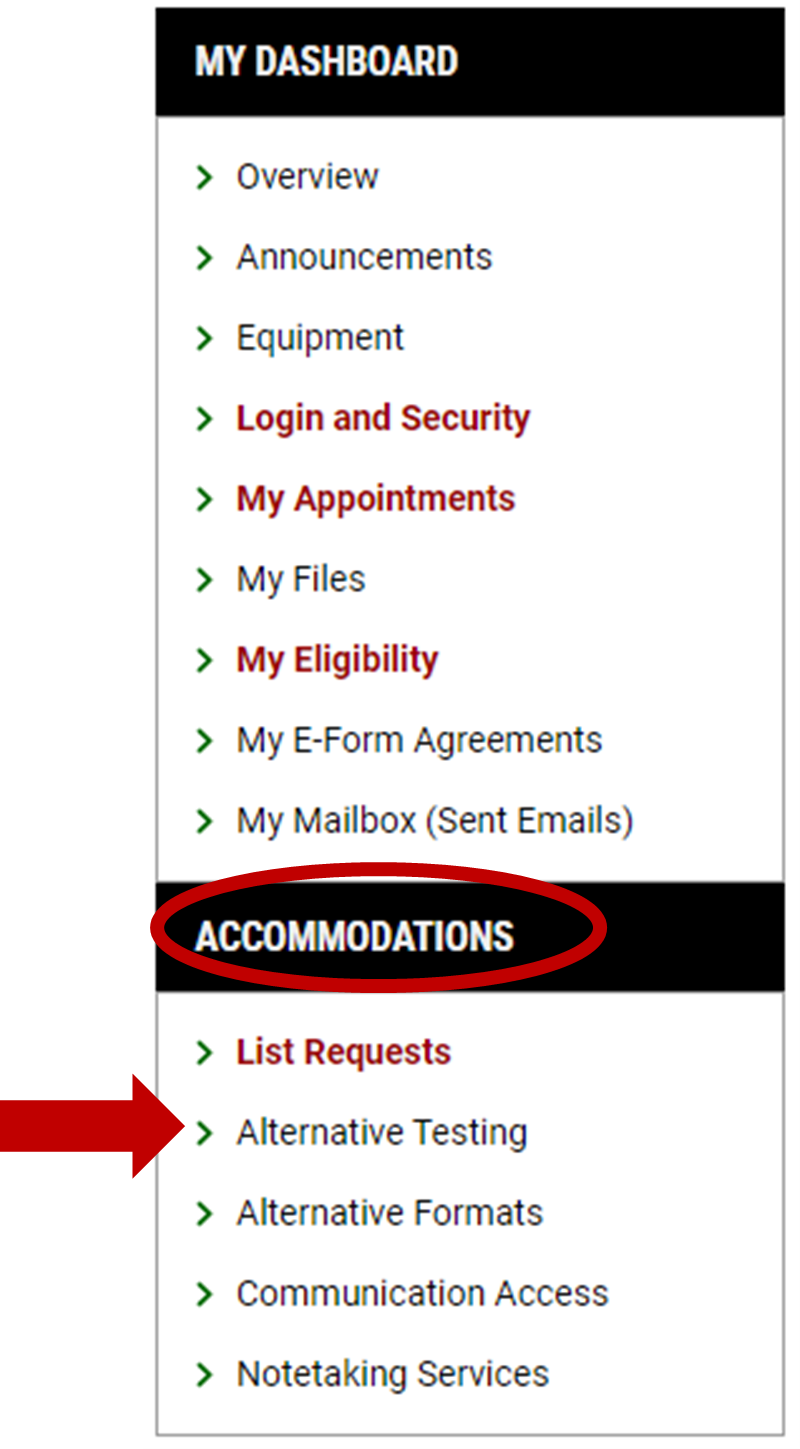
1. Using your ‘My Dashboard’ menu box found on the left-hand side of your screen, click on ‘My Eligibility’ tab that is bolded and in red color.
2. This will bring you to the ‘Academic Accommodations’ Scroll down to title ‘Eligibility’ to view your eligibility list.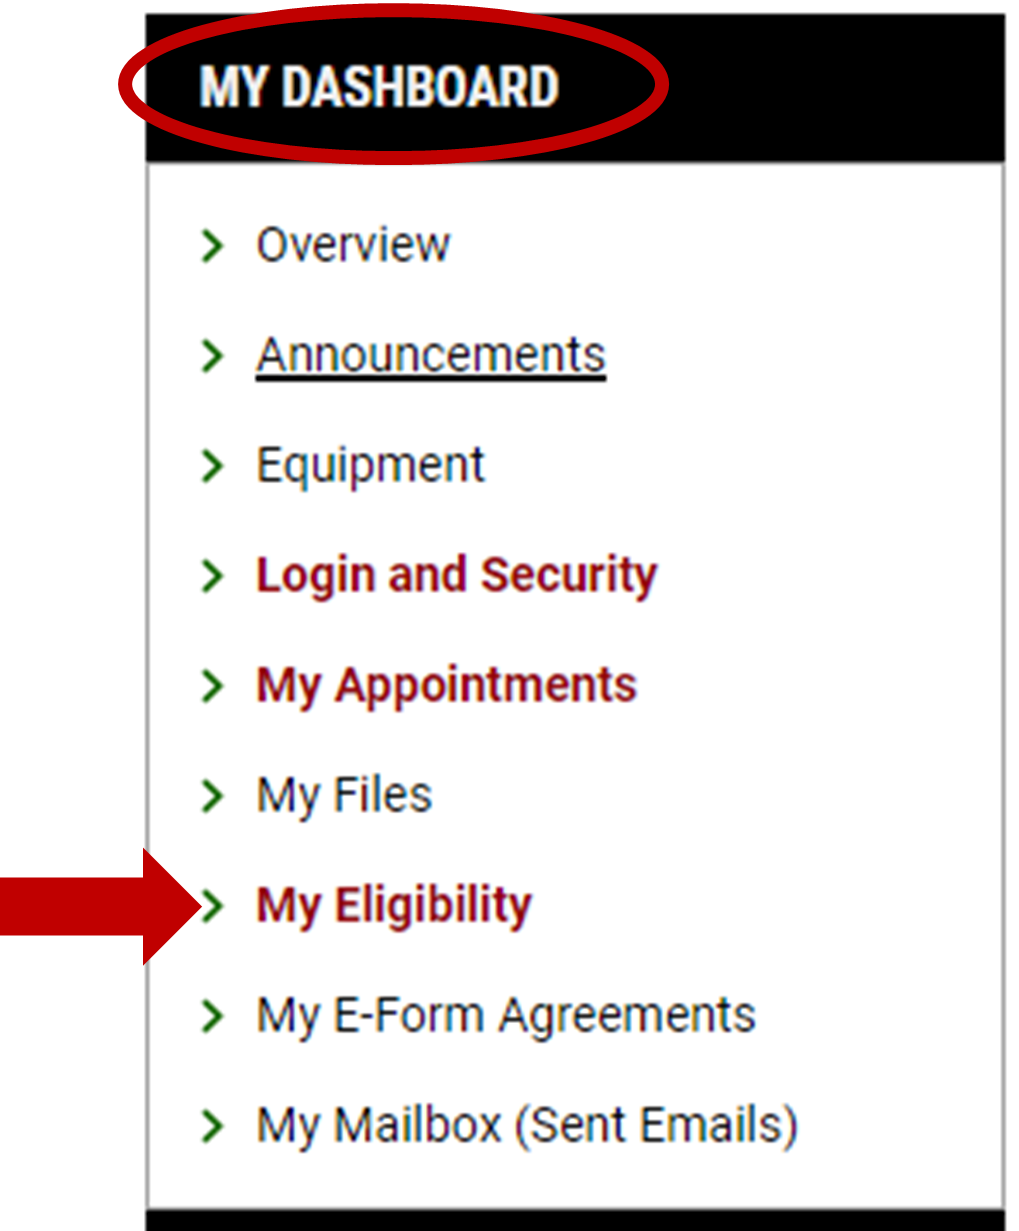
If you would like the full description on each accommodation, click on the arrow pointing down to expand the accommodation description.
a. If you would like to print/save this list with or without the description you may do this by generating a PDF.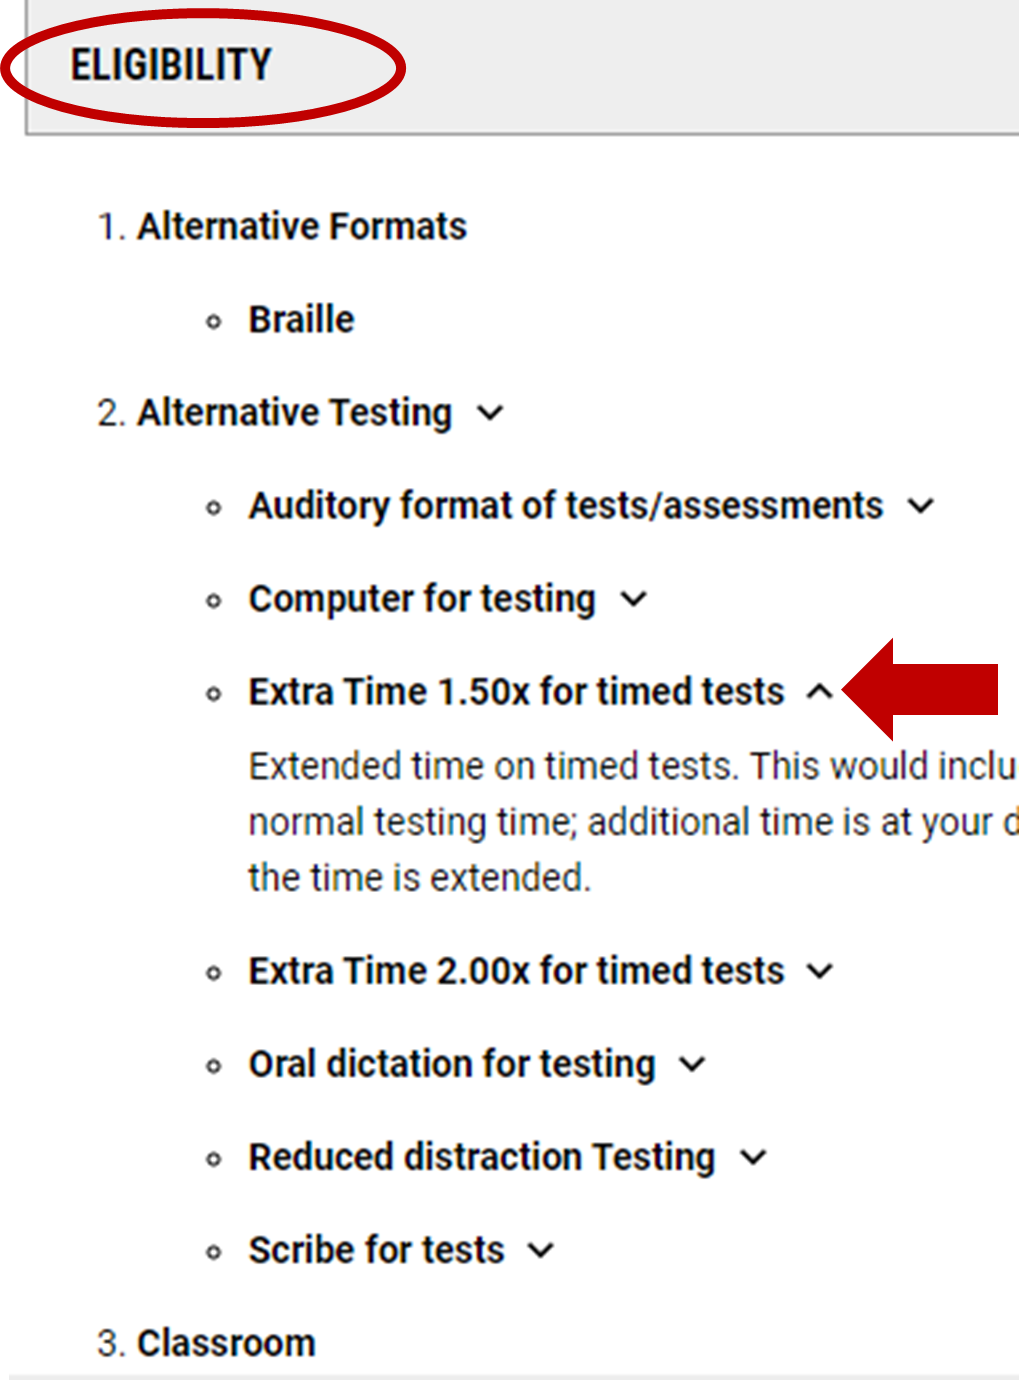
b. Using the ‘Handy Tools: Eligibility Letter in PDF’ box, click on either option; ‘Generate PDF’ or ‘Generate PDF with Description’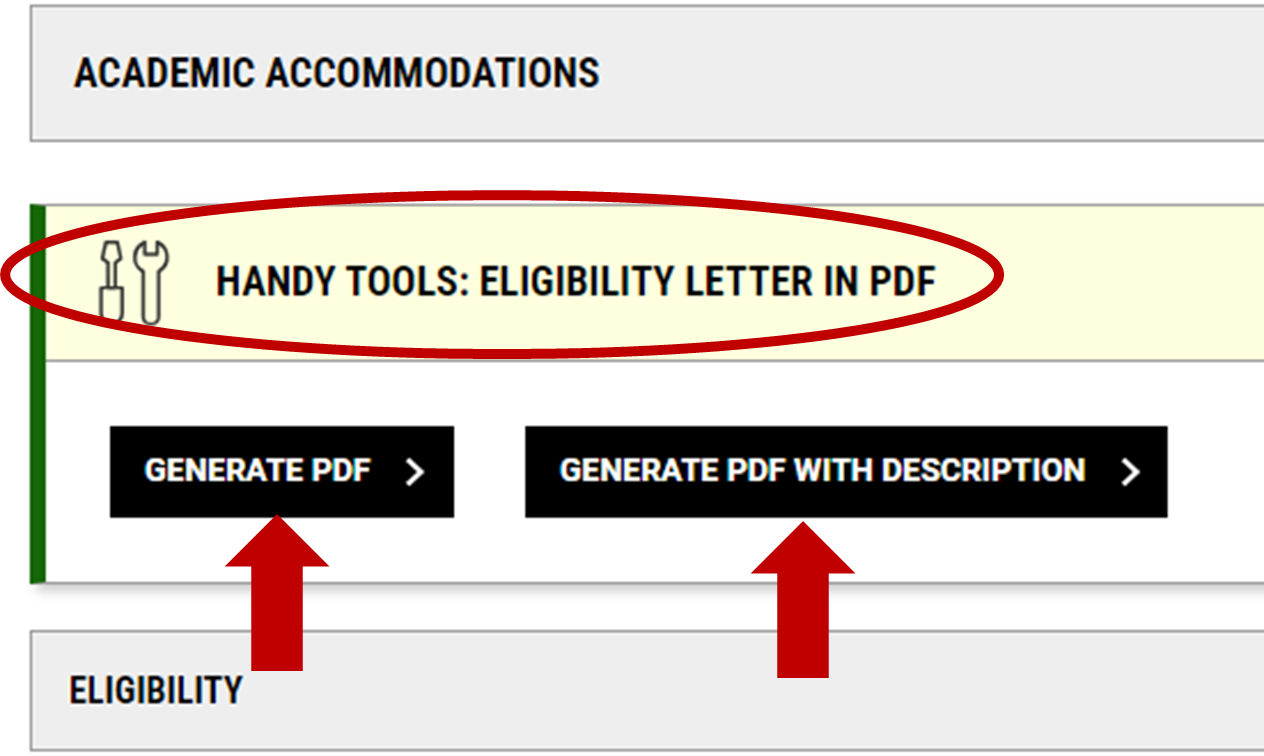
-
How To Schedule Your Accommodated Exams
Alternative Testing Visual Guide – Students
Always start by logging into your Student Portal with Disability Services on the Student Login Page on COCC.

How to schedule an exam request- Using the left-hand side menu box labeled ‘Accommodations’, click on ‘Alternative Testing’
- This will bring you to the ‘Schedule An Exam’
- Select Course by using the drop-down menu.
- Click on ‘Schedule an Exam’
NOTE: If your courses name has a * at the end of it this will mean you will need to enter the standard length of the exam in minutes. Standard length of the exam will be what the whole class will be given to take the exam, not including extra time accommodations.

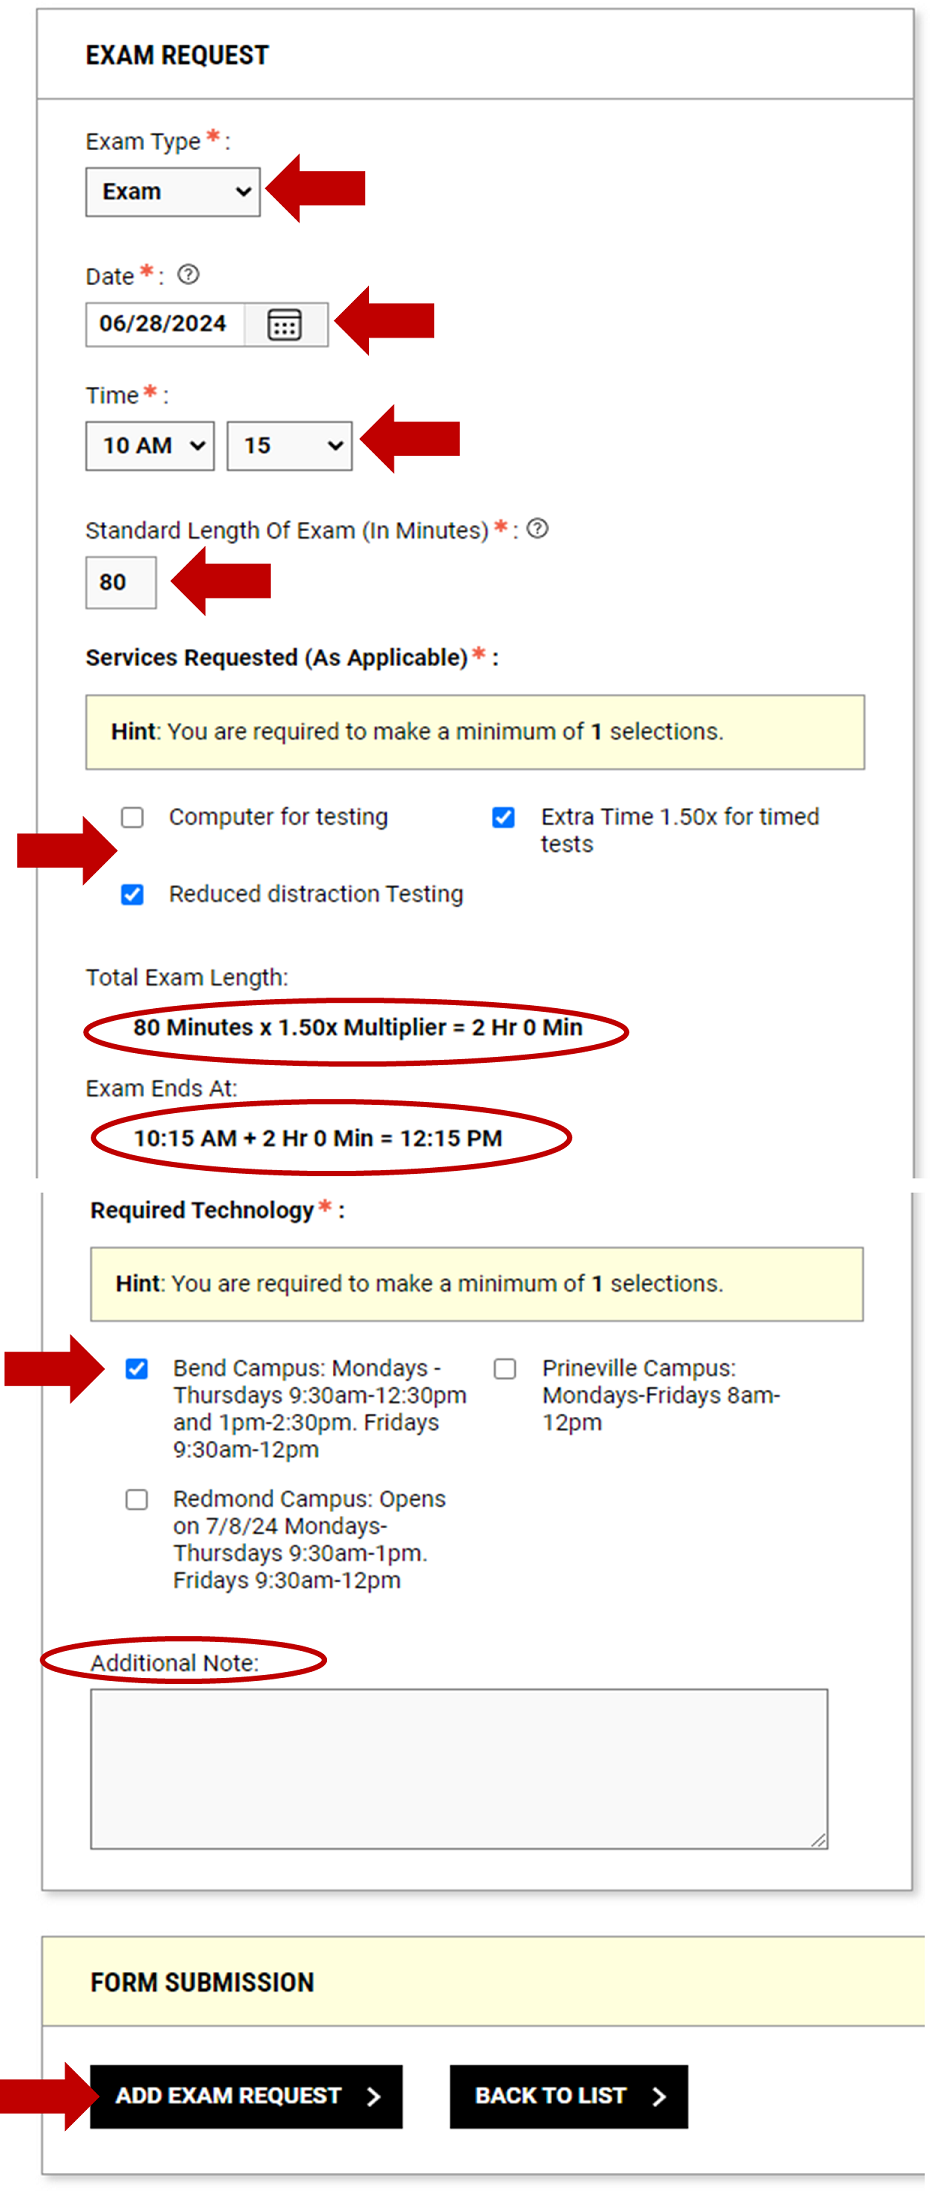
- This will bring you to the Exam Request box for you to complete all the required fields noted below: Screenshot is shown on
next page.
- Select Exam Type you will be taking, by using the drop-down menu
- Select Date you want to take the exam request – See the Testing Centers hours and locations in Required Technology field to ensure you are selecting a date we are open. If this creates a conflict with your course schedule please reach out to your instructor and/or Disability Services as soon as possible.
- Select Time you want to start your exam request in hours and minutes by using the drop-down menus. Example if you wanted to start at 12:30pm you would enter 12PM in the first box and 30 in the second box.
- Enter in Standard Length Of Exam (In Minutes) by entering in the box. If you do not know the standard length of the exam, please reach out to your instructor.
- Select Services Requested (As Applicable) aka accommodations you want to use on this exam request, by check marking the box next to listed accommodations.
- You will be able to see your Total Exam Length based on the standard length of exam and accommodations of extra time will be noted here.
- You will also be able to see when your Exam Ends At based on the total exam length and the start time.
- Select the location you would like to take this exam request at by using the Required Technology section and check mark the location.
- Additional Note is optional for you to enter if there is something you would like to note about this exam request. This note is not visible to your instructor.
- When ready to submit, click on ‘Add Exam Request’ at the bottom of the page.
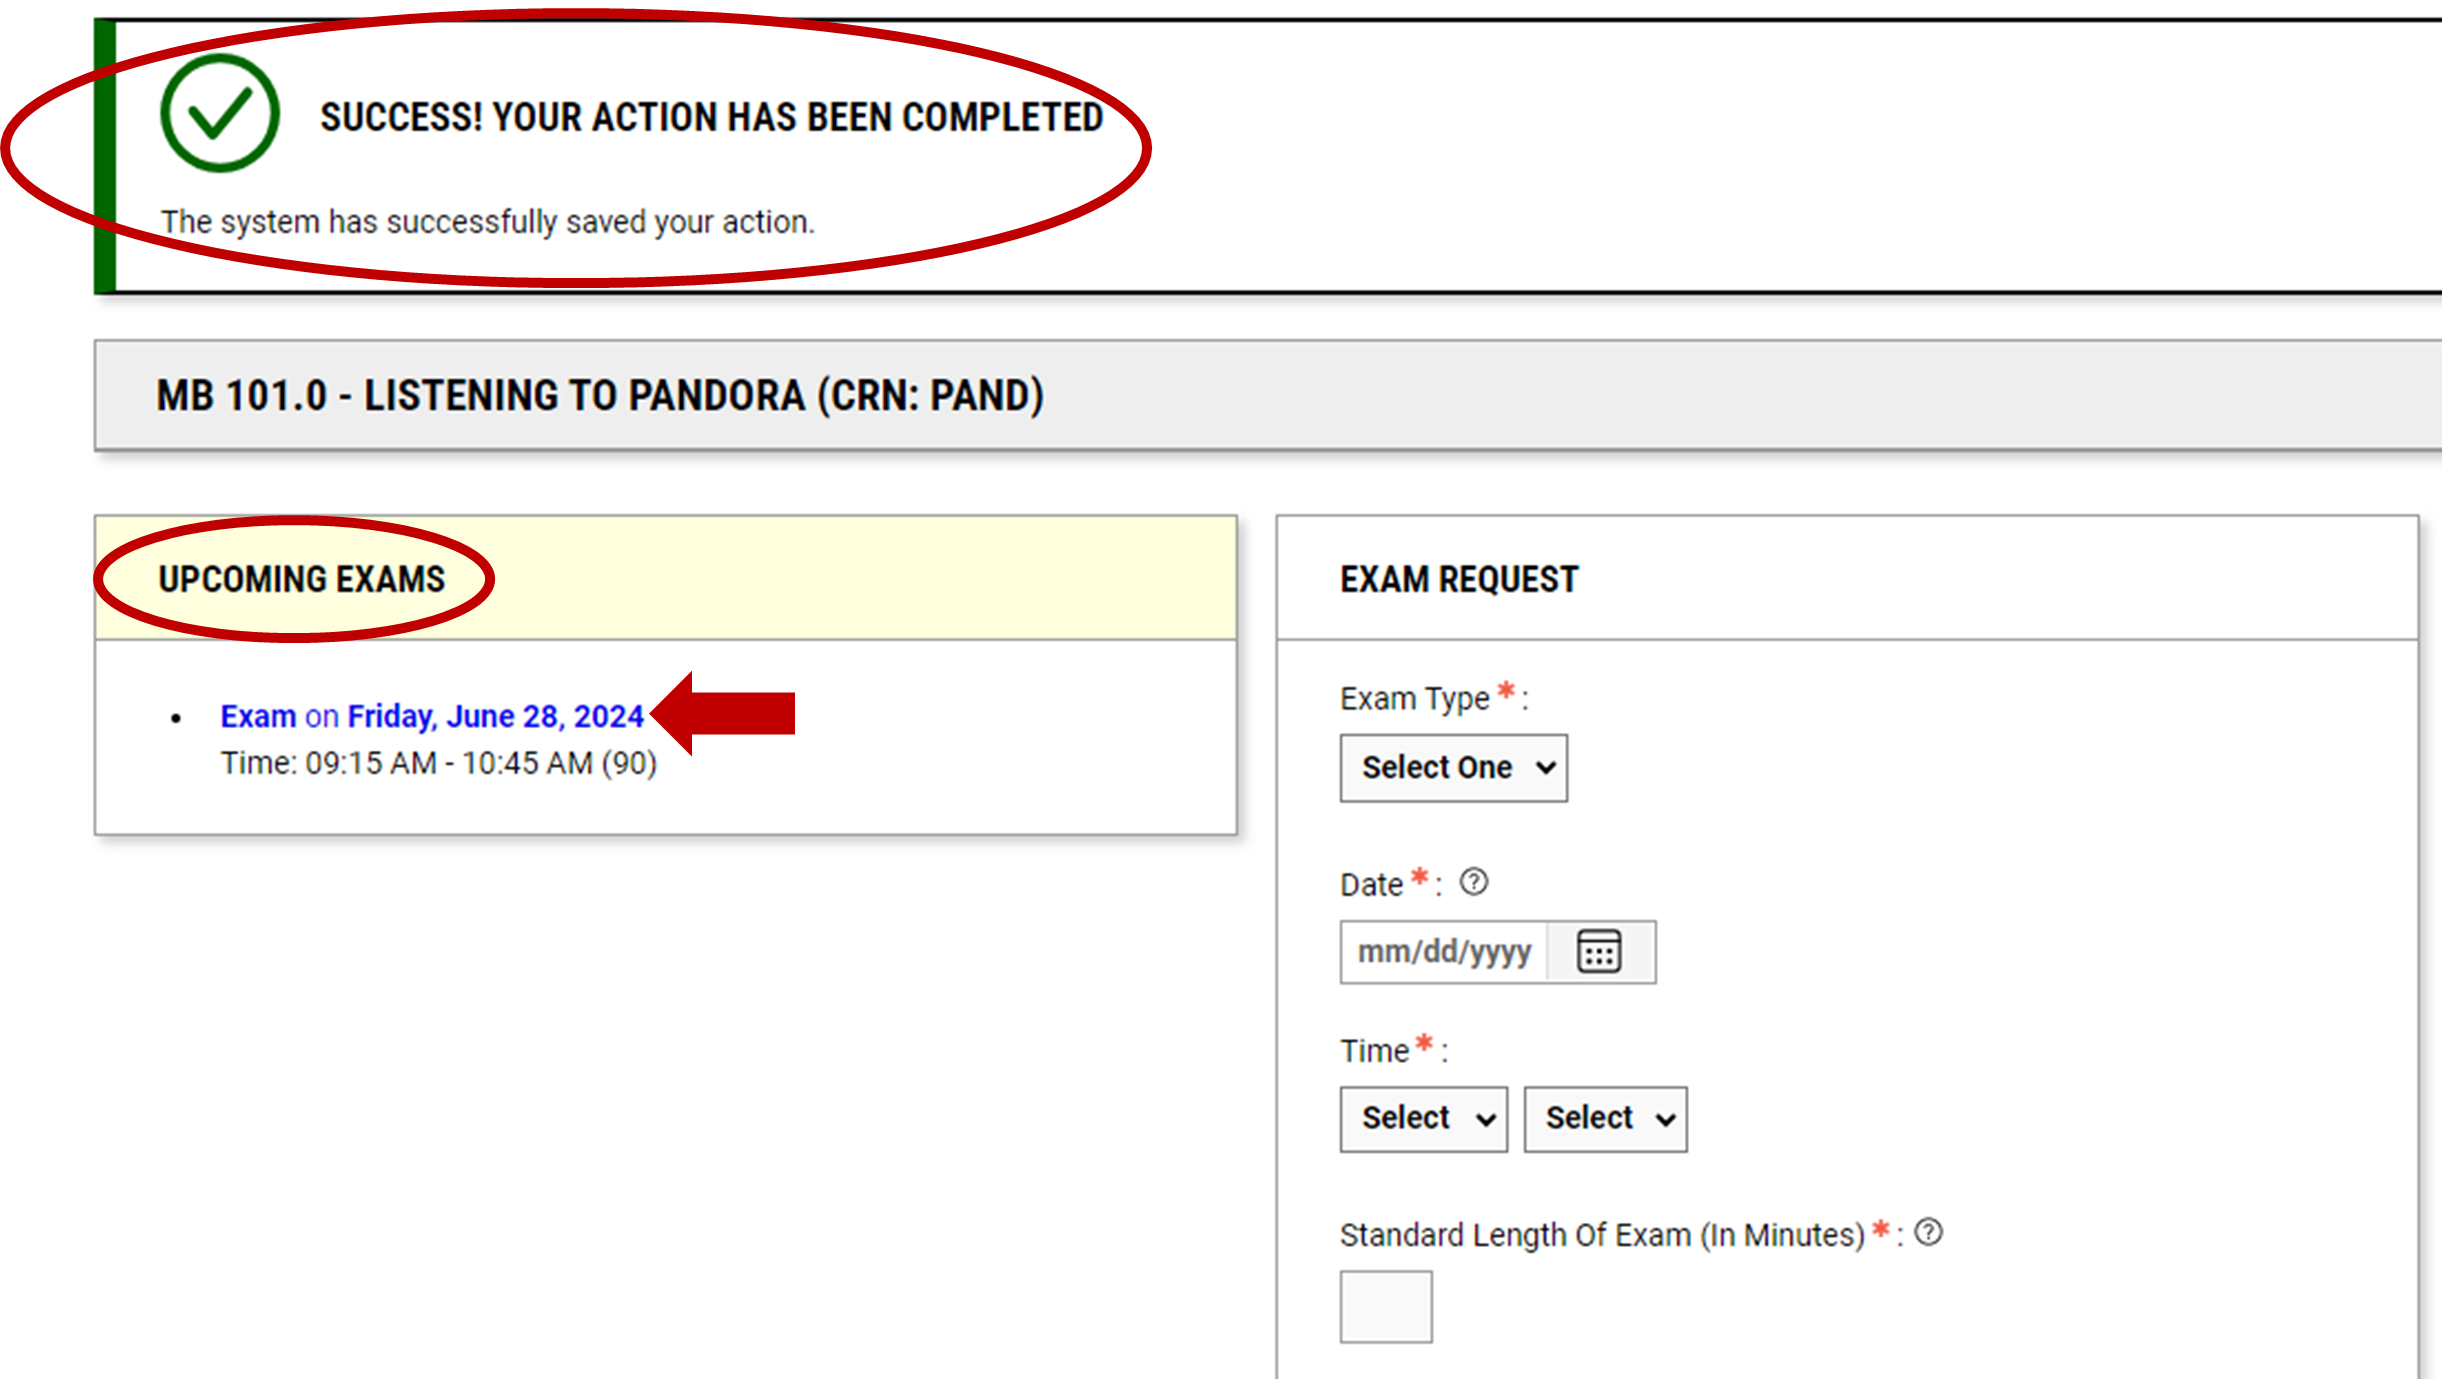
- Once added the exam request your page will refresh and you should receive a green
checkmark at the top of the page stating this was successful, along with receiving
an email confirmation receipt of this being added. If you do not receive this notice
your exam request did not get submitted successfully.
- This page will update to still allow for you to add exam requests and showing you a list of the exams, you added under ‘Upcoming Exams’.
- This is what you will use if you need to cancel your exam request.
-
- Click on the Exam date link.
- Scroll to the bottom of the page and click on ‘Cancel Exam Request’
- A pop-up confirmation window will appear for you to Confirm or Cancel your choice to cancel exam request.
-
-
How To Confirm Notetaking Services and Accessing Your Notes
***NOTE Services for Students with Disabilities offices will monitor the viewing of Notes to ensure the request is being used. Services not being used, may lead to cancellations of services for said course.***
Always start by logging into your Student Portal with Disability Services on the Student Login Page on COCC.
How To Confirm Notetaking Services
1. Using the ‘Accommodations’ menu box found on the left-hand side of the screen. Click on ‘Notetaking Services’
2. This will bring you to the ‘Notetaking Services’ full page for the current term.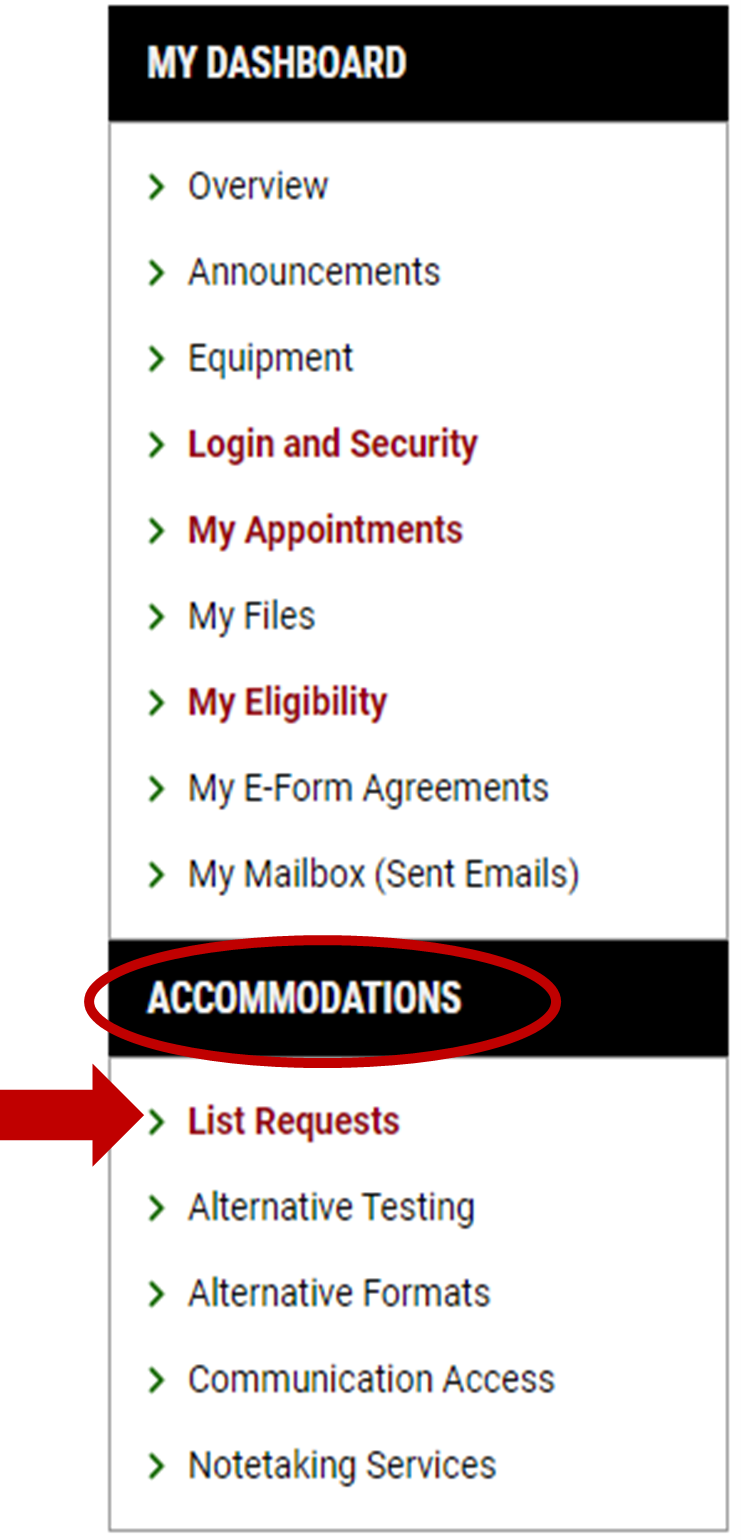
a. Using the middle box titled ‘Confirmation Needed’ and click on ‘View Request’
3. This will bring you to the ‘Notetaking Services – Requests’ page for the current term, with a list of your registered courses that you have requested notetaking services in. Once the term has been opened you will be able to click on blue bolded ‘Confirm’ found underneath the confirm section of the list.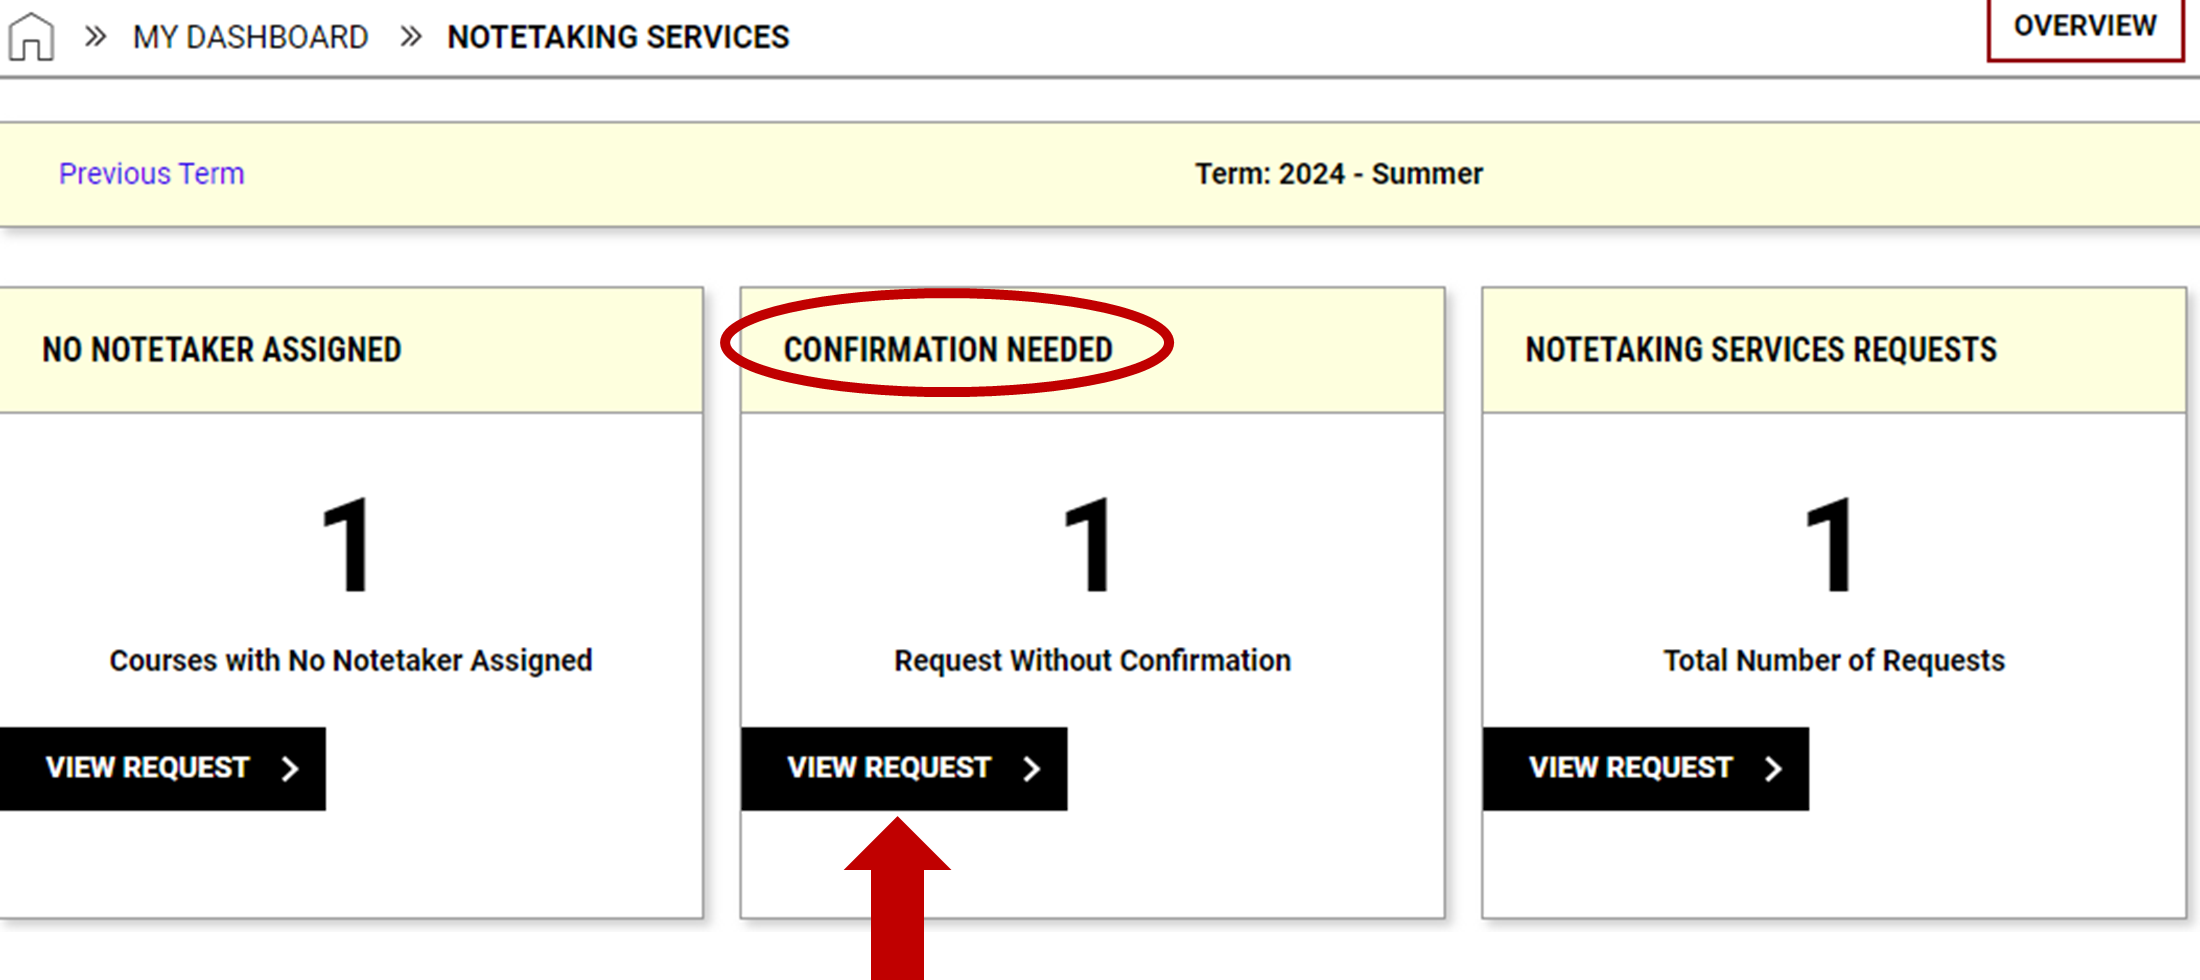
4. Once clicked this will automatically process and you will be taken back to the Notetaking Services main page, with a green checkmark at the top stating “Success! Your action has been completed”. If you did not receive this message, then your confirmation of notetaking services did not get submitted and will need to try again.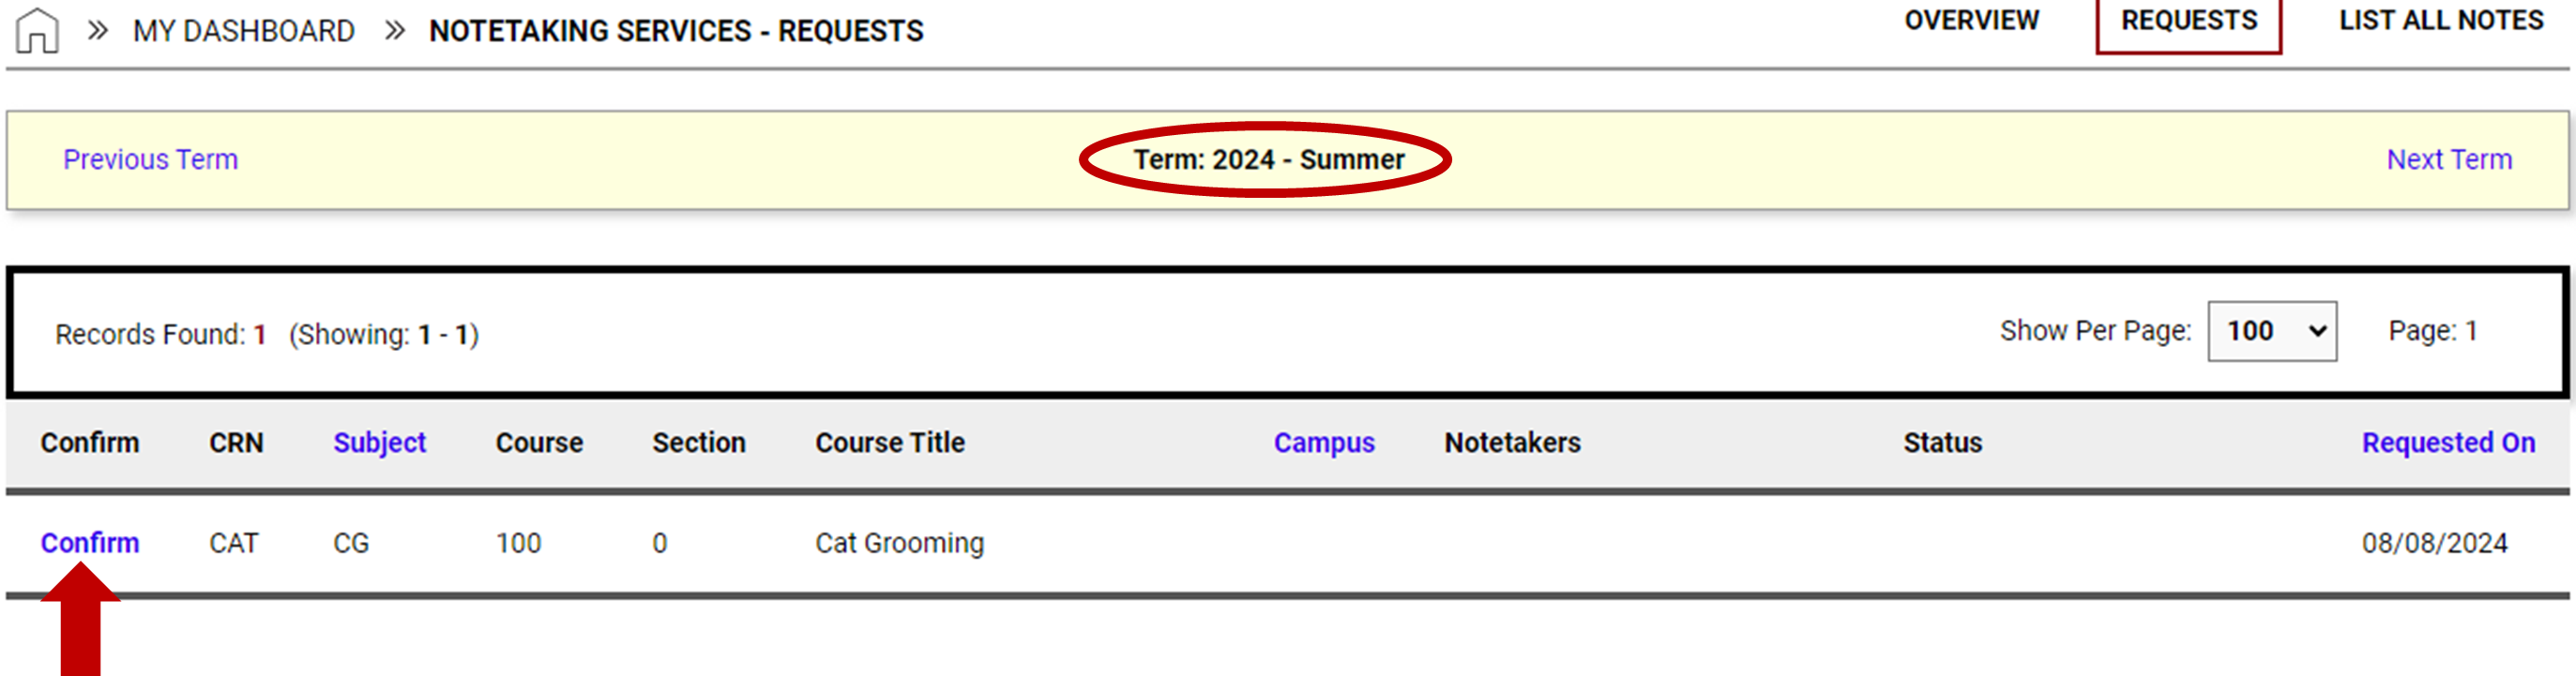
5. Once we have received your confirmation, we will continue the process of getting a Notetaker matched to the course. Take note, this process can be time consuming and we may do outreaching to your instructor and yourself for assistance in finding Notetaker for the course. we recommend you utilize your recording lecture accommodation. This way, you can still capture any live information you may need to reference. If you are in need of a recording device, you are welcome to check one out at no cost from our offices for the term at any time by contacting our office.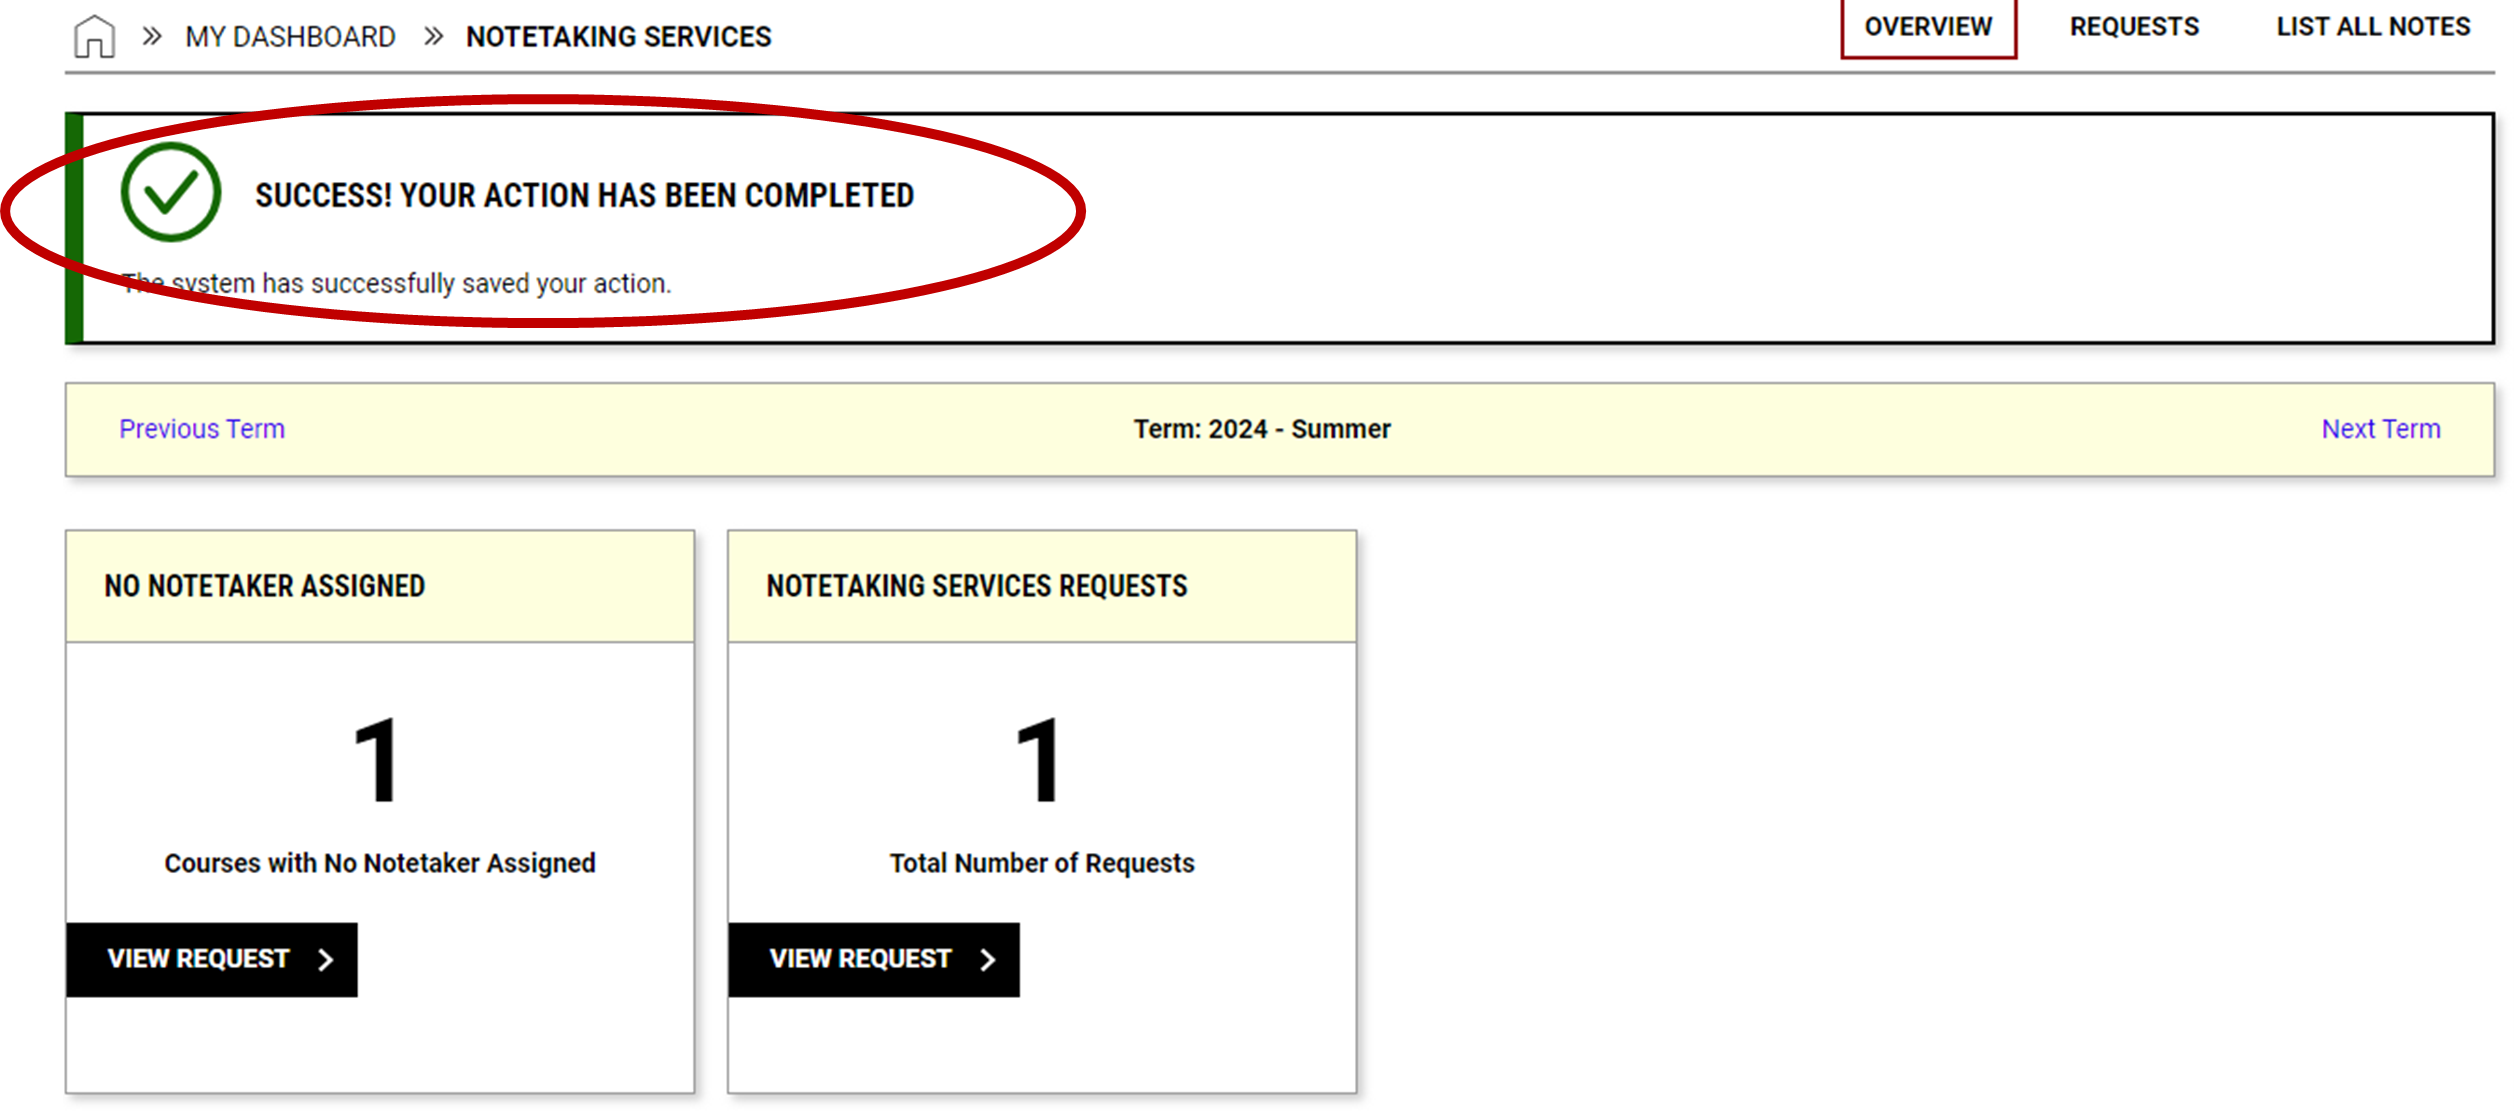
1. Once we have found a Notetaker to be matched to your course, we will send out a notification email stating we have found a notetaker and for what course.
How to Access your Notes
2. Once your Notetaker has uploaded a set of notes for your course, you will receive a separate notification email about what course has new notes posted online and that they are ready for you to download.
a. Login to your Disability Services student account or follow link in notification email.
3. Using the Using the ‘Accommodations’ menu box found on the left-hand side of the screen. Click on ‘Notetaking Services’
4. This will bring you to the ‘Notetaking Services’ full page for the current term.
a. Using the first box titled ‘Available Note’ and click on ‘View Note’
5. This will bring you to the ‘Notetaking Services – List All Notes’ page for the current term. Scroll down to the list of notes you are able to download.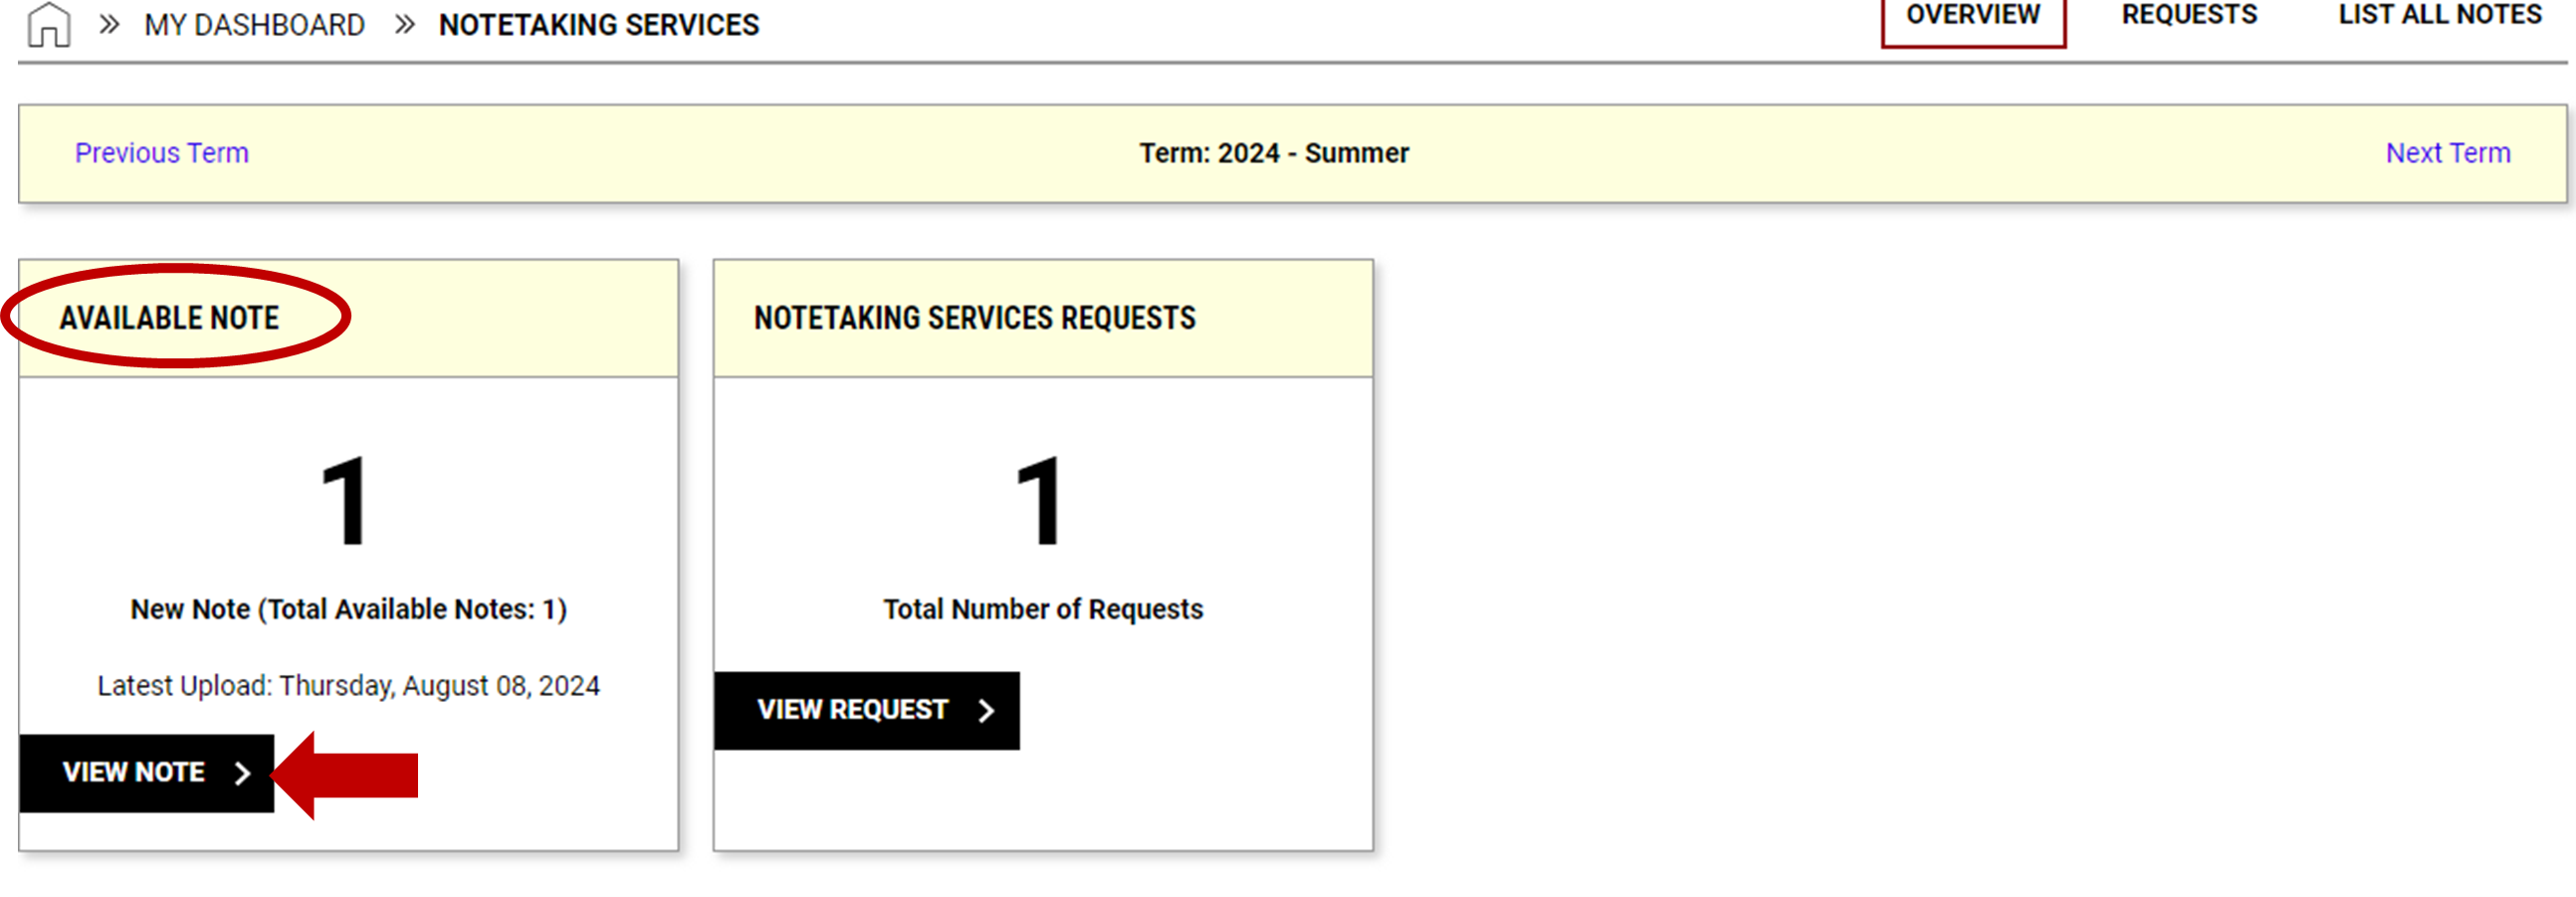
a. Click on ‘Download’ found under the download section. This will download immediately to your device after clicking.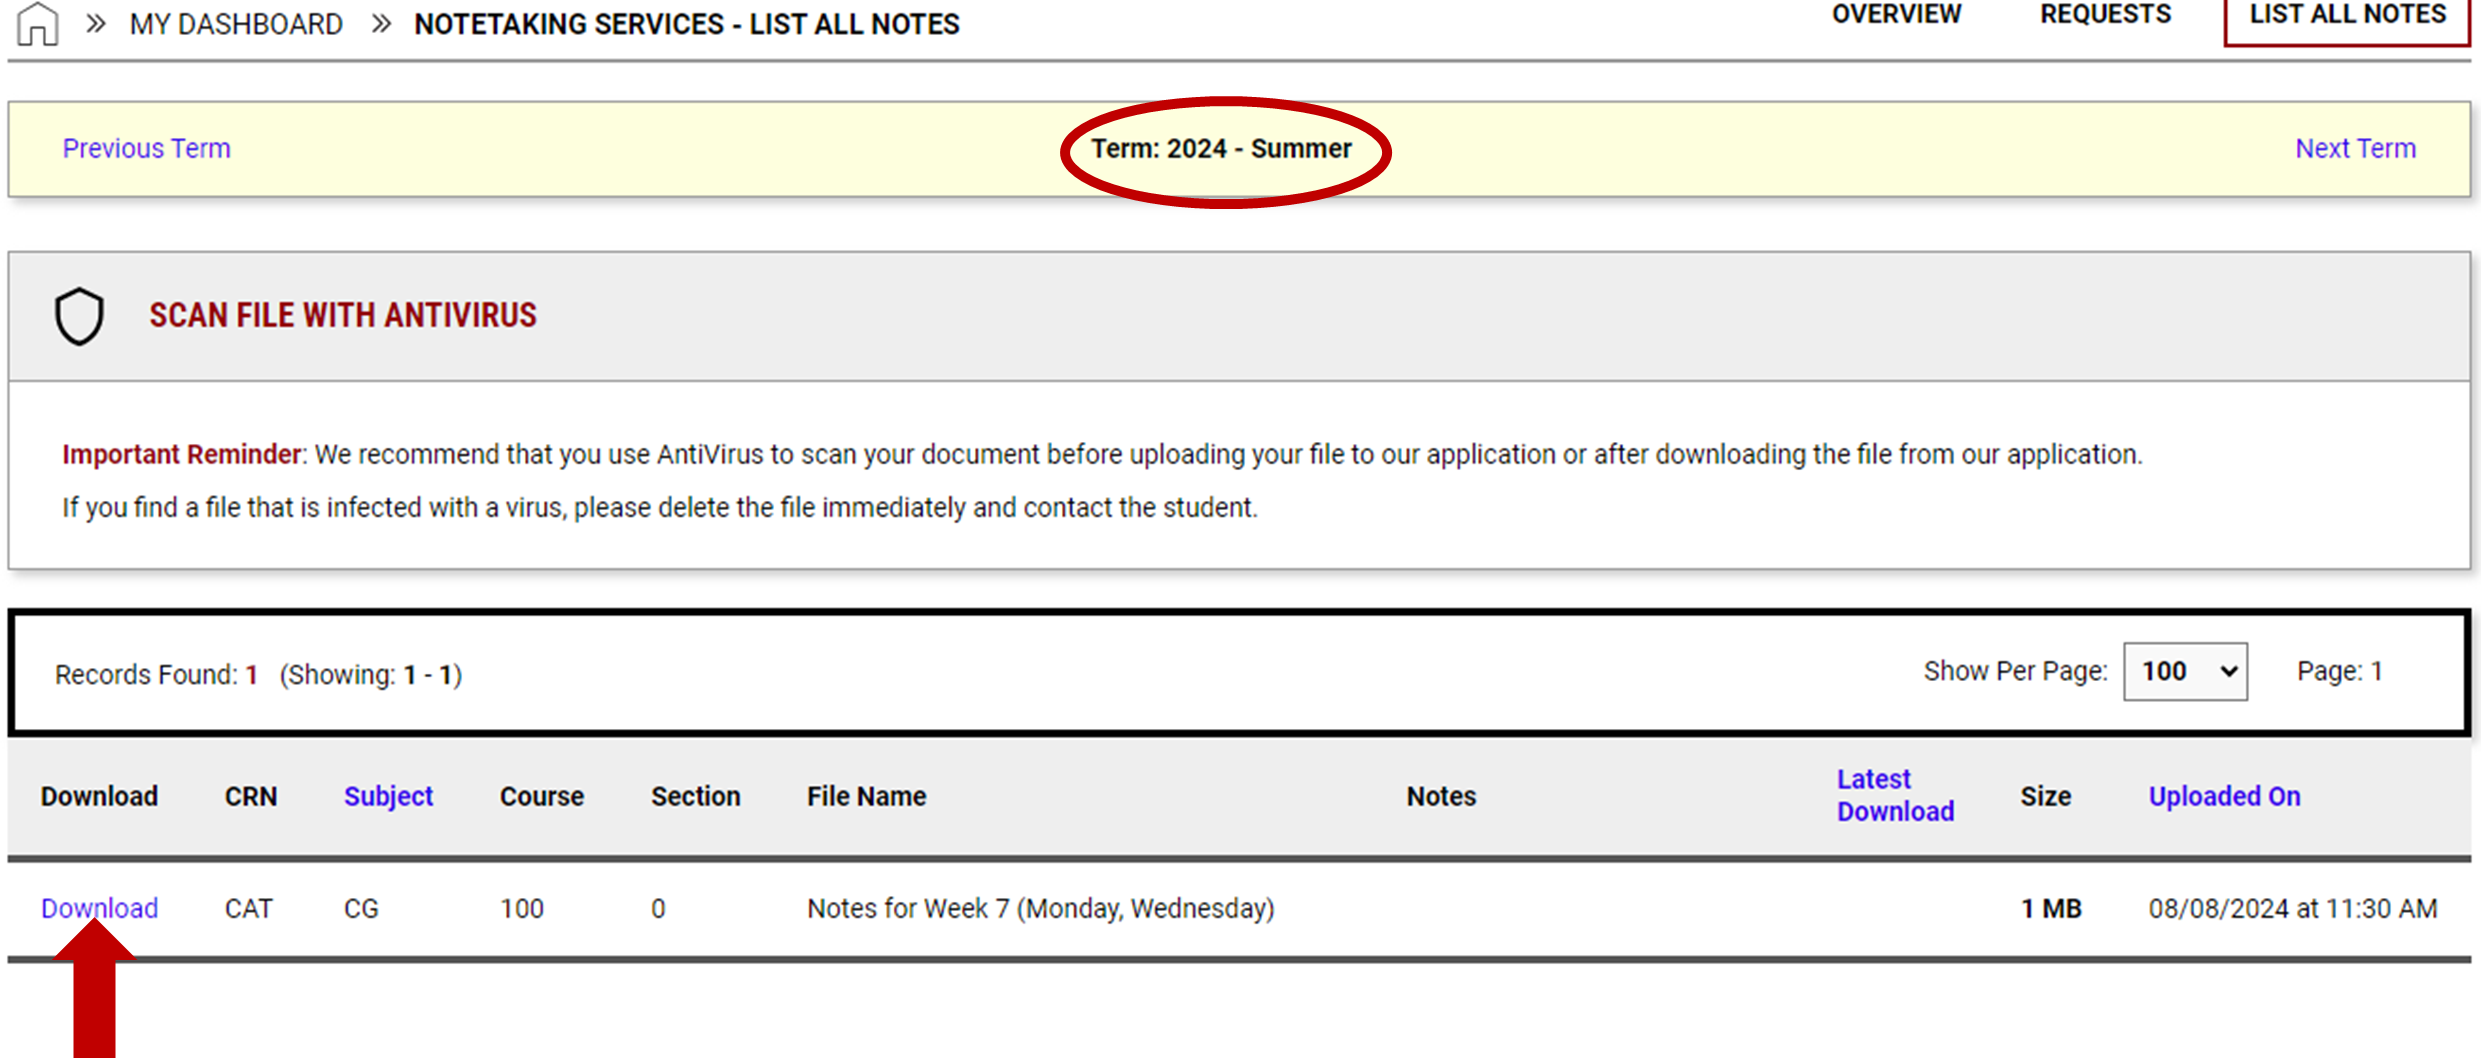
-
How to Use Microsoft Word Read Aloud
1. Click Review
2. Click Read Aloud
3. The document will begin reading from the beginning. The control panel will show in the top right corner (as pictured below). Here you can play, pause, and change the reading speed.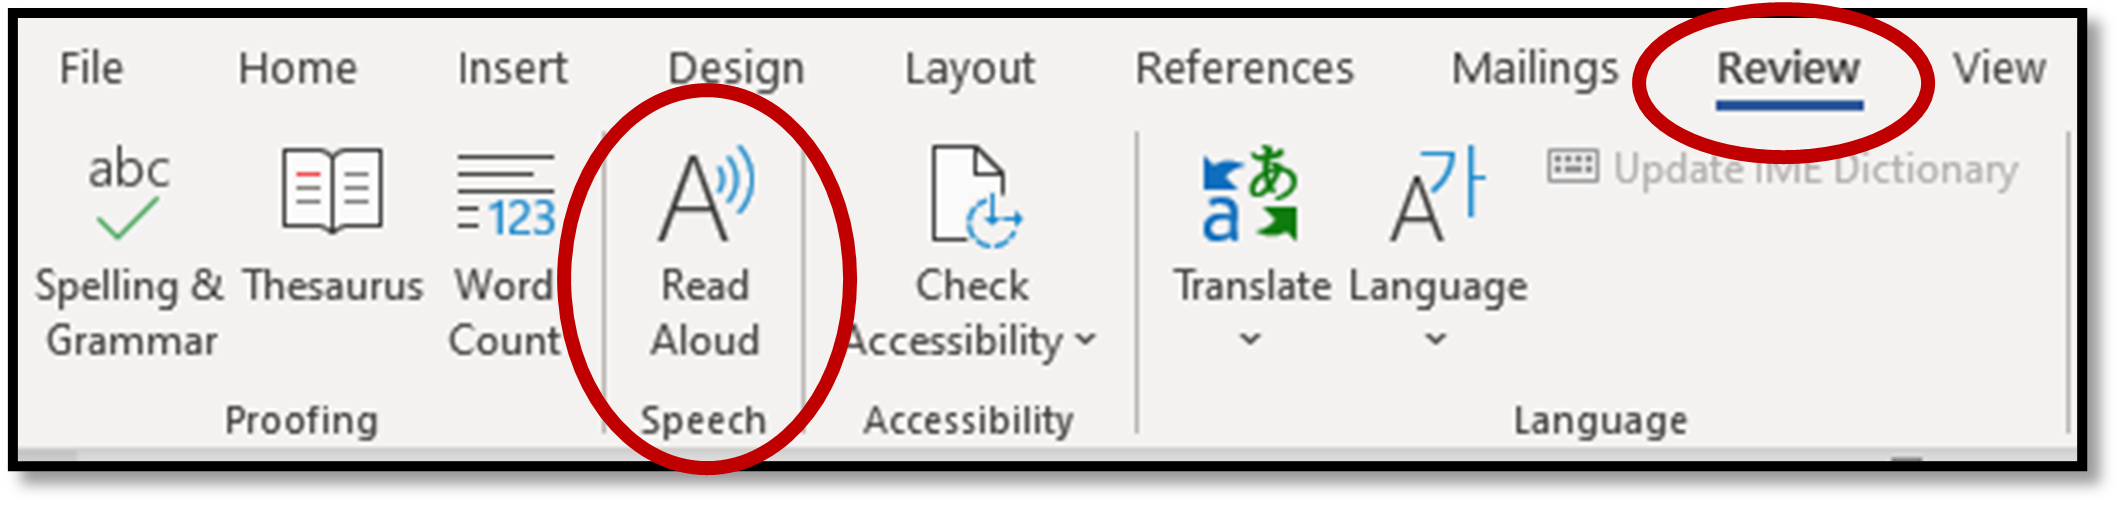
4. Using the mouse, you can also highlight the text you want read aloud and then push the play button.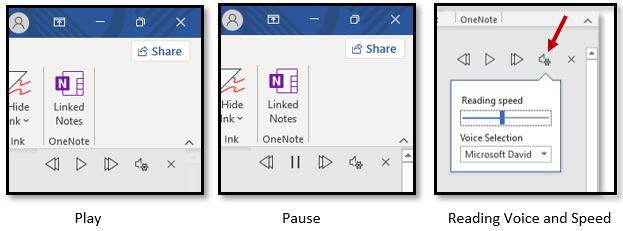
5. You can tell what is being read because it will be highlighted.